
Master Advanced Royal Icing Consistency for Stunning Cookie Details


Welcome to BakeWithEase, your trusted guide to baking perfection! Ever struggled with royal icing that's too runny or too stiff? In this article, we'll demystify royal icing consistency troubleshooting, unlocking the secrets to achieving flawlessly detailed cookie decorations. Discover the precise techniques and subtle adjustments that will elevate your creations from simple sweets to edible masterpieces. Get ready to transform your baking with our comprehensive guide – let's dive in!
- Mastering Royal Icing Consistency for Cookie Decorating
- Introduction to Royal Icing Consistency
- Royal Icing Consistencies
- Royal Icing Consistency Troubleshooting
- Achieving Perfect Royal Icing: Step-by-Step
- Advanced Royal Icing Techniques
- Royal Icing Tools and Equipment
- Royal Icing Recipes and Variations
- Storing and Preparing Royal Icing
- Conclusion: Mastering Royal Icing for Cookie Art.
-
Frequently Asked Questions
- What are the main royal icing consistencies needed for detailed cookie decorating?
- How can I tell if my royal icing is too thick?
- What's the best way to thin royal icing that's too thick?
- How do I prevent my royal icing from bleeding colors on my cookies?
- What does "count consistency" mean in royal icing recipes?
- Final Reflection: Mastering the Art of Royal Icing Consistency
- Unleash Your Inner Cookie Artist!
Introduction to Royal Icing Consistency
Why Royal Icing Consistency Matters
Achieving the correct royal icing consistency is perhaps the most critical factor in successful cookie decorating. Imagine trying to outline a delicate design with icing that's too thin – it would spread everywhere, losing definition instantly. Conversely, using icing that's too thick for flooding would result in a bumpy, uneven surface that cracks as it dries. The difference between a crisp, professional-looking cookie and one that looks homemade (and not in a charming way!) often boils down to this single element. Getting your royal icing consistency right is fundamental before you even think about color palettes or intricate piping.
Think of it like painting; you wouldn't use thick, undiluted paint for fine line work or watery paint to fill a large area evenly. Royal icing is similar. Each decorating technique requires a specific flow and body from the icing.
For instance, a fine outline on a sugar cookie might require icing that holds a sharp peak but flows smoothly from a small tip, perhaps a consistency that takes about 15-20 seconds to disappear when a line is drawn through it. Flooding, on the other hand, needs icing that spreads out and self-levels quickly within the outlined area, maybe a 10-12 second consistency. Mastering this fluidity control significantly impacts the final look, preventing issues like craters, bleeding colors, or breakage.
Understanding Royal Icing Textures
Royal icing isn't just one texture; it's a spectrum ranging from very stiff, like toothpaste, to very thin, almost like milk. These different textures are achieved by adjusting the ratio of liquid (usually water or lemon juice) to the powdered sugar and meringue powder or egg white base. A stiff consistency is ideal for structural elements like roses, borders, or intricate details that need to hold their shape firmly. It's thick enough that when you lift your spoon, the icing forms a peak that doesn't fall over.
Moving towards a thinner texture involves gradually adding small amounts of liquid. A medium consistency might be used for slightly softer details or borders that don't need to be quite as rigid. Flood consistency, as mentioned, is much thinner and designed to fill in large areas smoothly.
The thinnest consistency, sometimes called "glazing" consistency, is almost pourable and used for a very thin, smooth coat over a cookie, though it's less common for detailed work. Understanding how to transition between these textures by adding just a few drops of liquid at a time is a core skill in royal icing consistency troubleshooting.
Royal Icing Consistencies
Outline Consistency
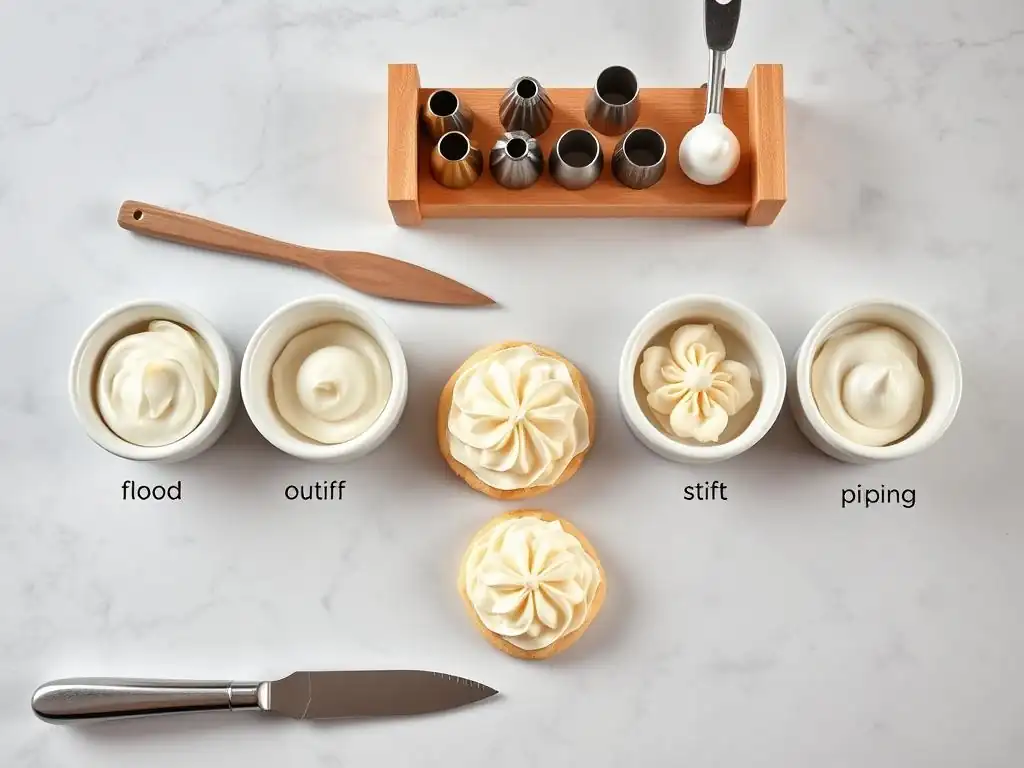
Outline consistency is typically the first consistency you'll prepare when decorating a cookie using the flood-and-outline method. It needs to be firm enough to create a barrier that holds your flood icing in place, preventing it from running off the edge of the cookie. When you lift your spoon or spatula from this consistency, it should form a peak that slowly bends or curls over, but doesn't immediately melt back into the mass.
A common test is the "counting" method: if you draw a line through the icing with a knife, the line should disappear in approximately 15-20 seconds. This allows you enough time to pipe the outline before it fully settles, while still being fluid enough to flow smoothly from a piping tip, usually a small round tip like a #1.
Using an outline consistency that is too thin is a frequent issue in royal icing consistency troubleshooting. If your outline spreads and looks blurry right after piping, or worse, the flood icing breaks through it, your outline consistency was too thin. Conversely, if it's too thick, it will be difficult to pipe smoothly, resulting in shaky or uneven lines, and the icing might break easily once dry.
Achieving this balance requires careful, gradual addition of liquid and frequent testing. For example, starting with a thick icing base, you might add just 1/4 teaspoon of water at a time, stirring thoroughly and testing the flow before adding more.
Flood Consistency
Flood consistency is designed to fill the areas within your outline and spread out smoothly to create a flat, even surface. It's significantly thinner than outline consistency but not so thin that it runs uncontrollably. When you lift your spoon from flood icing, it should ribbon back into the bowl and the line should disappear relatively quickly, typically within 8-12 seconds.
This "second count" test is widely used by decorators; drawing a line through the icing with a scribe tool or knife and counting how many seconds it takes for the surface to become smooth again. A 10-second consistency is a popular starting point for many flooding tasks.
The key characteristic of flood consistency is its self-leveling property. Once piped onto the cookie within the outline, it should spread out on its own, leaving minimal lines or peaks. If your flood icing leaves noticeable lines or requires excessive nudging with a scribe tool to smooth out, it's likely too thick (perhaps more like a 15-second consistency).
If it runs under your outline or pools excessively, it's definitely too thin (maybe a 5-second consistency). Getting this right minimizes issues like craters and ensures a beautiful base layer for further decoration, making it crucial for avoiding common royal icing consistency troubleshooting scenarios.
Stiff Consistency
Stiff consistency royal icing is the thickest commonly used consistency for cookie decorating. It's similar in texture to toothpaste or peanut butter. When you lift your spoon or spatula, the peak it forms should stand up straight and sharp without bending or falling over at all. If you draw a line through it, the line will remain defined indefinitely. This texture is achieved by using less liquid in the initial mixing process or by adding more powdered sugar to a base recipe.
This consistency is indispensable for piping detailed elements that need to hold a very specific shape, such as intricate borders, small flowers like roses or mums, leaves, or adding structural details like fences or lettering that requires a sharp, defined edge. Because it holds its shape so well, it doesn't spread or melt.
For instance, piping a shell border around the edge of a cookie requires a stiff consistency to ensure each shell holds its form. Trying to pipe these details with a thinner consistency would result in them slumping and losing their definition, highlighting the importance of having multiple consistencies ready when decorating complex cookies.
Medium Consistency
Medium consistency royal icing falls somewhere between outline and flood consistency, or sometimes between outline and stiff consistency, depending on the decorator's preference and the specific technique. There isn't one single definition, but it's generally firmer than flood icing but more fluid than stiff or even standard outline icing. It might have a second count of around 12-15 seconds. When a peak is lifted, it might hold for a moment before slowly starting to curl over.
This versatile consistency can be used for various purposes. Some decorators prefer a slightly softer outline consistency closer to medium, finding it flows more smoothly. Others use a medium consistency for piping slightly softer details than what stiff icing provides, such as soft swags, dots that need to settle slightly but still hold some height, or for techniques like brush embroidery where a bit of flow is helpful.
For example, piping dots with a medium consistency will result in rounded dots that settle slightly, whereas stiff icing would create more pointed, defined dots. Understanding the nuances of this intermediate consistency adds flexibility to your decorating repertoire.
Royal Icing Consistency Troubleshooting
Common Royal Icing Problems
Decorating with royal icing can sometimes feel like navigating a minefield of potential issues. Even experienced decorators encounter challenges. One of the most frequent problems is incorrect consistency – icing that's too thick to flow smoothly or too thin to hold its shape, leading to messy lines, spreading, or craters. Another major hurdle is air bubbles trapped within the icing, which can pop on the cookie surface and leave unsightly pits, especially in flooded areas. This often happens during mixing or when the icing sits for a while.
Color bleeding is another frustrating issue, where a darker color spreads into a lighter adjacent color, ruining crisp lines. This can be caused by using too much liquid coloring, especially gel paste, or by applying wet icing layers on top of other layers that aren't fully dry. Cracking or breaking of the dried icing is also common, often due to the icing being too thick, drying too quickly on the surface while the inside is still wet, or applying it too thickly. Understanding these common pitfalls is the first step in effective royal icing consistency troubleshooting.
Troubleshooting: Royal Icing Too Thick
When your royal icing is too thick, it will be difficult to pipe smoothly. It might break as it comes out of the tip, require excessive pressure on the piping bag, or result in jagged, uneven lines. For flooding, icing that is too thick won't self-level, leaving prominent lines or peaks that won't settle flat. This typically means you haven't added enough liquid relative to the amount of powdered sugar and meringue powder. It might feel stiff and resistant when you stir it.
A common scenario where this happens is when following a recipe strictly without accounting for environmental factors like humidity, which affects how much liquid the dry ingredients absorb. If your goal was a 10-second flood consistency and you've ended up with something closer to 20 seconds, you definitely need to adjust. This is a classic case requiring royal icing consistency troubleshooting: the solution is simple but requires patience and precision.
Solutions for Thick Royal Icing
The primary solution for royal icing that is too thick is to gradually add more liquid. The best liquid to use is typically water, though some decorators prefer lemon juice or clear extract for flavor. It is crucial to add the liquid very slowly, often just a few drops or 1/4 teaspoon at a time. After adding a small amount, stir the icing thoroughly for at least 30 seconds to a minute to allow the liquid to fully incorporate and affect the consistency.
After stirring, test the consistency again. Use the "second count" method for flood icing, or the peak test for outline/stiff consistencies. If it's still too thick, repeat the process: add a tiny bit more liquid, stir well, and test again.
It's much easier to thin icing that's too thick than to thicken icing that's too thin, so err on the side of adding too little liquid at a time. For example, if working with 2 cups of thick icing, you might start by adding just 1/2 teaspoon of water, assessing, and then adding another 1/2 teaspoon if needed, rather than adding a tablespoon all at once. This controlled approach is key to successful royal icing consistency troubleshooting.
Icing that is too thin will spread uncontrollably, fail to hold any piped shape, and for flooding, it will likely run under your outline or create very thin, fragile layers that are prone to cracking. If you're aiming for an outline consistency and it's running off the cookie, or trying to flood and it's spreading like water, you've added too much liquid. This is a common error, especially for beginners, as it's easy to overshoot when thinning icing.
Recognizing when your icing is too thin is fairly obvious – it lacks body and structure. If you draw a line through flood icing and it disappears instantly (0-3 seconds), it's too thin. If outline icing slumps completely flat immediately after piping, it's too thin. While fixing overly thick icing is straightforward, fixing overly thin icing requires adding more dry ingredients, which can sometimes affect the texture or color slightly. Effective royal icing consistency troubleshooting involves knowing how to correct this imbalance.
Solutions for Thin Royal Icing
To thicken royal icing that is too thin, you need to add more dry ingredients. The most common addition is powdered sugar. You can also add more meringue powder, which helps with structure and drying, but adding too much can make the icing brittle or affect the taste. When adding powdered sugar, add it gradually, perhaps a tablespoon at a time for a medium batch of icing (e.g., 2-3 cups).
Sift the powdered sugar before adding it to prevent lumps. Add the measured amount to your icing and stir thoroughly until completely incorporated. Then, test the consistency. If it's still too thin, repeat the process.
Be aware that adding significant amounts of powdered sugar can sometimes slightly dull colors or make the icing feel a bit grainy if not mixed very well. Another option, if you have some on hand, is to add a small amount of stiff consistency royal icing base that hasn't been thinned yet. This is often easier than adding just powdered sugar, as the dry ingredients are already mixed with some liquid. This strategic addition of dry or thick components is vital in royal icing consistency troubleshooting.
Troubleshooting: Royal Icing Air Bubbles
Air bubbles are tiny pockets of air trapped within the royal icing. They are often introduced during the mixing process, especially if using a stand mixer on high speed, or when vigorously stirring the icing. They can also form as the icing sits, particularly if it's not covered properly or if you stir it roughly before use. These bubbles become problematic when you pipe or flood, as they can rise to the surface and pop, leaving unsightly pits in your smooth icing layer. This is especially noticeable on large, flat flooded areas.
While a few small bubbles might not be a disaster, a lot of them can ruin the look of your cookies. Identifying air bubbles is easy – you'll see tiny bubbles rising to the surface of your icing in the bowl or appearing in your piping bag. Preventing them is better than removing them, but removal is a necessary skill in royal icing consistency troubleshooting.
Removing Air Bubbles
There are several methods for removing air bubbles from royal icing. The most effective is often letting the icing rest. After mixing, cover the bowl tightly with plastic wrap pressed directly onto the surface of the icing to prevent a crust from forming. Let it sit on the counter for 15-30 minutes. This allows many of the trapped bubbles to rise to the surface and dissipate. Before using, stir it gently with a spatula, trying not to whip more air into it.
Once the icing is in your piping bag, you can also help remove bubbles. Gently massage the bag, squeezing and working the icing towards the tip. If you see bubbles gathering near the tip, you can snip off a bit more of the bag or switch tips.
When piping or flooding, use a scribe tool or toothpick to gently pop any bubbles that appear on the surface of the icing before it starts to crust over. For flooded areas, you can lightly tap the cookie on the counter a few times after flooding; this helps the icing settle and encourages bubbles to rise and pop. These techniques are essential for smooth results and are key aspects of royal icing consistency troubleshooting.
Troubleshooting: Royal Icing Color Bleeding
Color bleeding occurs when one color of royal icing, usually a darker one, spreads into an adjacent lighter color, blurring the lines between them. This can happen when a wet, darker color is piped next to or on top of a wet or partially dry lighter color. The moisture from the darker icing reactivates the surface of the lighter icing, allowing the pigments to migrate. Using excessive amounts of gel food coloring, which contain a liquid base, can also contribute to bleeding, especially with vibrant or dark shades like red, black, or navy blue.
Humidity can also play a role; in very humid conditions, icing dries slower and remains susceptible to bleeding for longer. Bleeding is particularly frustrating because it can ruin intricate designs that rely on crisp color separation. Preventing it is much easier than fixing it, as once colors bleed, there's no way to reverse it. Understanding the causes is vital for successful royal icing consistency troubleshooting related to color.
Preventing Color Bleeding
Preventing color bleeding primarily involves allowing sufficient drying time between applying different colors, especially when piping darker colors next to or on top of lighter ones. After flooding a cookie with a base color, allow it to dry and crust over completely before piping details on top. For outlines and flood fills using adjacent colors, pipe the outline and fill one section, then skip the adjacent section and fill another area further away. Allow the first filled sections to crust over (usually 15-30 minutes) before going back to fill the skipped sections. This creates a barrier between wet areas.
Use high-quality gel food coloring, which is concentrated and requires less volume than liquid dyes to achieve vibrant colors. Add color sparingly and mix it in thoroughly. If making very dark colors, consider making them a day in advance; sometimes colors deepen over time without adding more dye, reducing the amount of liquid introduced. For very humid conditions, consider using a fan (not blowing directly) or a food dehydrator on a low setting (around 90-100°F or 32-38°C) to speed up the drying process between layers. These preventative steps are crucial for avoiding this common royal icing consistency troubleshooting issue.
Troubleshooting: Royal Icing Not Drying Properly
Royal icing is supposed to dry hard, creating a durable, non-sticky surface. If your icing remains soft, sticky, or takes an excessively long time to dry (many hours or even days), there's likely an issue with the recipe, mixing, or drying conditions. A common cause is adding too much liquid during thinning, resulting in icing that is simply too wet to set up properly. Another factor can be using an incorrect ratio of meringue powder or egg white to powdered sugar; these are the ingredients that provide the structure and hardness when dried.
High humidity is a significant environmental factor that hinders drying. In humid conditions, moisture in the air prevents the water in the icing from evaporating efficiently. Applying icing too thickly can also cause issues; the surface might crust over, trapping wet icing underneath, which can lead to cracking or a soft interior. Addressing these factors is key to effective royal icing consistency troubleshooting for drying issues.
Ensuring Proper Drying
To ensure royal icing dries properly, start with a balanced recipe that has the correct proportions of powdered sugar, meringue powder (or egg white), and liquid. Avoid adding excessive amounts of liquid when thinning; aim for the desired consistency, not just thinness. Mix the icing thoroughly, but avoid over-whipping after adding liquid, which can incorporate too much air and potentially affect drying.
Environmental conditions play a huge role. Royal icing dries best in a dry environment. If you live in a humid area, consider using a fan to circulate air around the cookies as they dry (avoid blowing directly on them, which can cause craters or rippling) or use a food dehydrator set to a low temperature (around 90-100°F or 32-38°C).
This provides a controlled, dry environment that significantly speeds up drying time, often allowing cookies to dry hard within 4-8 hours instead of 24+ hours in high humidity. Applying icing in thinner, even layers rather than thick mounds also helps ensure that the entire layer dries uniformly. These steps are vital for avoiding soft or sticky icing and mastering royal icing consistency troubleshooting.
Achieving Perfect Royal Icing: Step-by-Step
Step 1: Preparing Your Royal Icing Base
The foundation of perfect royal icing begins with accurately measuring your ingredients. A standard recipe typically involves powdered sugar, meringue powder (or pasteurized egg whites), and water. Use fresh, good-quality ingredients. Sift your powdered sugar, even if it says "lilik" or "confectioners' sugar," to remove any lumps and ensure a smooth final texture. This is a critical step often overlooked, leading to frustrating clogs in piping tips later on.
Combine the powdered sugar and meringue powder in a large mixing bowl. If using a stand mixer, use the paddle attachment. Gradually add the water while mixing on a low speed. Start with the amount specified in your recipe, but be prepared to adjust.
The mixture will initially look very thick and paste-like. Mix on low speed for about 5-7 minutes until the icing is smooth, glossy, and holds stiff peaks. Scrape down the sides of the bowl periodically to ensure everything is incorporated. This stiff base is where you'll start adjusting consistency, making it a fundamental step in preventing future royal icing consistency troubleshooting.
Step 2: Adjusting for Outline Work
Once you have your stiff royal icing base, you'll likely need to thin a portion of it for outline work. Separate the amount of icing you anticipate needing for outlining into a separate bowl. Add liquid (water is standard) very slowly, a few drops or 1/4 teaspoon at a time. After each small addition, stir the icing thoroughly with a spatula for at least 30 seconds to fully incorporate the liquid and see its effect on the consistency.
Test the consistency frequently. Dip a spoon and let the icing fall back into the bowl – does it form a peak that slowly bends? Draw a line through the icing with a knife – does it disappear in about 15-20 seconds? Continue adding tiny amounts of liquid and testing until you reach your desired outline consistency. Remember, it's much easier to thin icing than to thicken it, so be patient and add liquid incrementally. This careful adjustment is key to avoiding issues that require royal icing consistency troubleshooting later.
Step 3: Achieving Ideal Flood Consistency
Next, prepare the portion of your royal icing base designated for flooding. Like with outline consistency, transfer the required amount to a separate bowl. Add liquid (water) gradually, stirring thoroughly after each addition. You will need to add more liquid than for the outline consistency. The goal is an icing that flows smoothly and self-levels within the piped outline.
Use the "second count" test to determine the ideal flood consistency. Draw a line through the icing; it should disappear and the surface should be smooth again within 8-12 seconds. A 10-second consistency is a great starting point for many decorators.
If it takes longer than 12 seconds, add a few more drops of water and stir. If it disappears faster than 8 seconds, it's too thin and you'll need to add a tiny bit of powdered sugar or some of your stiff base. Achieving this balance is crucial for a smooth flood layer and minimizes issues like craters, a common reason for royal icing consistency troubleshooting.
Step 4: Creating Stiff Royal Icing
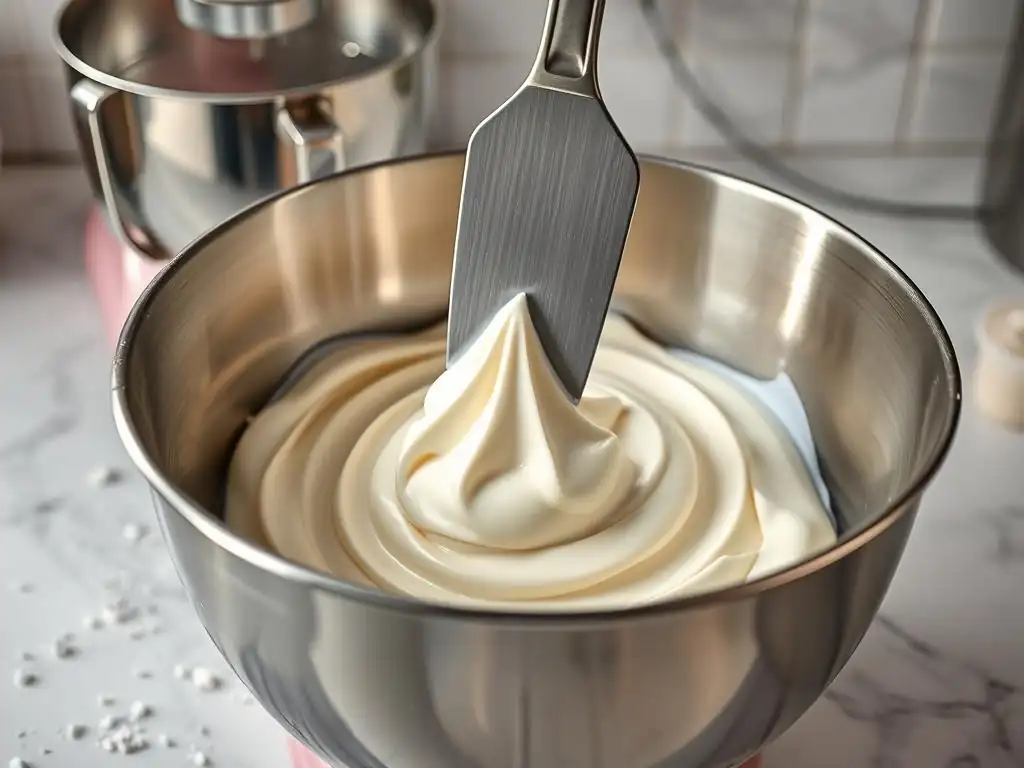
If your initial royal icing base is already mixed to a stiff peak (as described in Step 1), you may not need to do anything further for this consistency. This very thick icing is used for piping details that need to hold a sharp shape, like roses or intricate borders. When you lift your spoon, the peak should stand straight up without bending.
If your base recipe resulted in something slightly softer, you can thicken it by adding a small amount of sifted powdered sugar, a tablespoon at a time, and stirring thoroughly until the desired stiff consistency is reached. Alternatively, some decorators make an even stiffer base specifically for piping flowers by slightly increasing the ratio of powdered sugar to liquid from the start. Having a truly stiff consistency ready is essential for certain decorative elements that would simply slump if piped with thinner icing, avoiding specific royal icing consistency troubleshooting related to detail work collapsing.
Step 5: Testing and Adjusting
Once you believe you've achieved the correct consistency for outlining, flooding, or stiff details, always test it before committing to decorating your cookie. For outline and flood consistencies, pipe a line onto a piece of parchment paper or a practice cookie. Does the outline hold its shape without spreading? Does the flood icing spread smoothly and self-level within a few seconds? Draw a line through the flood icing – does it disappear in your target second count (e.g., 10 seconds)?
For stiff icing, pipe a small star or dot. Does it hold a sharp peak? If the test reveals the consistency isn't quite right, adjust it. Add a few more drops of water if too thick; add a tiny bit of powdered sugar or stiff icing if too thin. Continue testing and making small adjustments until it performs exactly as needed for the specific technique you plan to use. This iterative testing and adjusting process is the heart of mastering royal icing consistency troubleshooting.
Advanced Royal Icing Techniques
Wet-on-Wet Technique
The wet-on-wet technique involves applying wet royal icing onto a freshly flooded area of wet royal icing. Because both layers are wet, the colors will blend together, creating a smooth, flat surface with integrated designs. This technique is used to create effects like marbling, pulling lines through dots to make hearts or flowers, or dragging a tool through stripes or dots to create patterns like feathers or spiderwebs.
To execute this, first flood a section of your cookie with your base flood color (e.g., white). Immediately, while the base is still completely wet, pipe lines, dots, or swirls of a contrasting color (or multiple colors) onto the wet base. Then, using a scribe tool or toothpick, gently drag through the wet icing layers to create your desired pattern.
The key is speed – you must work quickly before the surface of the base layer starts to crust over, which usually happens within 5-10 minutes depending on humidity. This technique requires a consistent flood icing that stays wet long enough to manipulate, highlighting the importance of proper royal icing consistency.
Brush Embroidery
Brush embroidery is a delicate technique that mimics the look of embroidered fabric on a cookie. It involves piping a line or shape with medium or stiff consistency royal icing and then, while the icing is still wet, using a slightly damp (not wet!) brush to gently pull the edges of the icing inwards, creating a soft, feathery effect. This is often used for floral elements, leaves, or decorative borders.
You typically pipe a section of your design, maybe about an inch or two long, and then immediately use a small, clean paintbrush (like a fine detail brush used for painting) to gently pull the icing. Dip the brush tip in clean water and blot most of the moisture off on a paper towel – you want it barely damp. Then, starting at the edge of the piped line, brush inwards towards the center of the shape.
Work in small sections, piping and brushing, before the icing crusts. The consistency is key here; if it's too stiff, it will be hard to pull; if too thin, it will just smear. A consistency slightly softer than standard outline (perhaps a 12-15 second flow) often works well, though some prefer a true stiff peak.
Overpiping
Overpiping is a technique used to add dimension and texture to cookie designs by piping layers of icing on top of dried royal icing. This allows you to build up height and create intricate, raised patterns. It's often used for elaborate borders, adding details to characters, creating quilted effects, or piping lattice work.
To overpipe successfully, the base layer of icing must be completely dry and hard. Piping wet icing onto wet icing will cause bleeding or the upper layer to sink in. You can use various consistencies for overpiping depending on the desired effect. Stiff consistency is ideal for creating sharp, defined lines and dots that stand tall.
Medium consistency can be used for slightly softer, rounded elements. You can pipe lines, dots, swirls, or other shapes directly on top of the dried base. Once dried, these raised elements add a beautiful, tactile quality to the cookie. Ensuring your base layer is fully dry (often 8-24 hours depending on conditions) is crucial for this technique to work without issue.
Marbling
Marbling, similar to wet-on-wet but often covering a larger area, involves swirling different colors of wet royal icing together to create a marbled or swirled effect. This technique is typically done directly on the cookie surface. It requires all the colors being used to be at the same flood consistency and applied while still wet.
Flood your cookie with a base color. Immediately, before the base color crusts, add drops, lines, or swirls of other colors on top of the wet base. Then, using a scribe tool or toothpick, gently drag through the colors in various patterns – straight lines, swirls, zigzags – to blend them and create the marbled look.
The key is to work quickly and ensure all icings are at the same, relatively thin flood consistency (around 8-10 seconds is common) so they meld together smoothly without one sinking into the other or crusting prematurely. This technique is a beautiful way to add organic patterns and requires careful management of multiple colors at the correct, uniform royal icing consistency.
Royal Icing Tools and Equipment
Essential Tools
Beyond the basic mixing bowls and spatulas, a few essential tools are crucial for working with royal icing. Accurate measuring cups and spoons are vital, as consistency relies heavily on ingredient ratios. A kitchen scale can be even more precise for measuring powdered sugar. Sifters or fine-mesh strainers are necessary for sifting powdered sugar and meringue powder to prevent lumps, a common cause of piping tip clogs.
You'll also need containers to store your different colors and consistencies of icing; airtight containers are best, with plastic wrap pressed directly onto the surface to prevent crusting. Spoons or small scoops are useful for transferring icing into piping bags. And of course, you'll need the tools for application and manipulation: piping bags, piping tips, and scribe tools. Having these items readily available streamlines the decorating process and helps prevent common royal icing consistency troubleshooting issues related to preparation and application.
Piping Bags and Tips
Piping bags are indispensable for applying royal icing to cookies. You can use reusable silicone or plastic bags, or disposable plastic bags. Disposable bags are popular for royal icing as they are easy to clean up and you can use many different colors and consistencies without washing in between. For royal icing, cut a small opening at the tip of the bag. You can either insert a piping tip directly into the bag and push it down until it fits snugly, or use a coupler, which allows you to change tips on the same bag of icing.
Piping tips come in various shapes and sizes. For outlining and fine details, small round tips are standard, such as sizes #1, #1.5, or #2. For flooding, you can use the same small round tips or snip a slightly larger opening directly in the piping bag (without a tip) if your flood consistency is thin enough to flow freely. Larger round tips (#3, #4, etc.)
can be used for thicker lines or dots. Star tips or other shaped tips are used for decorative borders or specific floral elements with stiff icing. Having a variety of tips on hand allows for versatility in your decorating designs.
Scribe Tools
A scribe tool is a simple but incredibly useful instrument for royal icing decorating. It's essentially a sharp point attached to a handle, similar to a large needle or a dental pick. Scribe tools are used for a variety of tasks, particularly with flood consistency icing.
Their primary uses include:
- Popping air bubbles: Gently touching the surface of wet flood icing to pop any bubbles that rise.
- Guiding flood icing: Nudging the icing into corners or tight spaces within the outline.
- Creating patterns: Dragging through wet-on-wet icing to create marbled or feathered effects.
- Cleaning up edges: Removing small mistakes or stray bits of icing before they dry.
You don't need a fancy scribe tool; a sharp toothpick or even a straight pin can work in a pinch, though dedicated scribe tools are comfortable to hold and have a consistent point. This little tool is invaluable for achieving smooth flood surfaces and executing detailed wet-on-wet techniques, making it essential for effective royal icing consistency troubleshooting during application.
Royal Icing Recipes and Variations
Classic Royal Icing Recipe
A classic royal icing recipe typically uses powdered sugar, meringue powder, and water. Meringue powder is a dried mix containing egg white powder, sugar, cornstarch, and stabilizers, providing structure and hardness without the risks associated with raw egg whites. A common ratio might be approximately 1 pound (about 4 cups) of powdered sugar to 3-4 tablespoons of meringue powder and 1/2 cup of water, plus flavorings like vanilla or almond extract. However, the amount of water is highly variable depending on humidity and desired consistency.
To make it, you usually whisk together the powdered sugar and meringue powder. Then, add the water and extract and mix on low speed until combined, then increase speed to medium-low and beat for 5-7 minutes until stiff peaks form and the icing is glossy. This base is then thinned with more water to achieve outline, flood, or medium consistencies. The quality of ingredients matters; using a good brand of meringue powder generally yields more reliable results. This base recipe is the starting point for all your royal icing consistency adjustments.
Vegan Royal Icing Recipe
For those avoiding animal products, vegan royal icing is a fantastic alternative. Instead of meringue powder or egg whites, vegan recipes typically use aquafaba (the liquid from canned chickpeas) or a commercial vegan meringue powder substitute. Powdered sugar remains the primary ingredient, along with flavorings.
A common vegan recipe might substitute the meringue powder and water with whipped aquafaba. You would whip aquafaba until frothy, then gradually beat in sifted powdered sugar until the desired consistency is reached. Some recipes might include stabilizers like cream of tartar or cornstarch.
Vegan royal icing behaves very similarly to traditional royal icing and can be adjusted for different consistencies using water or more aquafaba. It dries hard, though sometimes it can be slightly more prone to cracking depending on the recipe and humidity. Experimentation may be needed to find a vegan recipe that performs exactly as you like for different royal icing consistency needs.
Flavored Royal Icing
While classic royal icing has a sweet, slightly vanilla flavor from the powdered sugar and extract, you can easily add other flavorings to enhance your cookies. Standard extracts like vanilla, almond, lemon, or clear butter extract are common additions. Use clear extracts if you want to avoid tinting your white icing. Add extracts at the beginning of the mixing process with the initial liquid.
You can also use flavored emulsions, which provide a more intense and consistent flavor than extracts and are less likely to evaporate during drying. Another option is adding finely grated citrus zest for a fresh burst of flavor, though this can slightly affect smoothness. For example, adding lemon extract or zest is popular for lemon-flavored sugar cookies. Just be mindful that adding too much liquid flavoring can affect your icing consistency, requiring slight adjustments with powdered sugar. A few drops of a concentrated flavor can make a big difference without significantly altering the icing's body.
Storing and Preparing Royal Icing
Proper Storage Techniques
Proper storage is essential to prevent royal icing from drying out or crusting over before you're ready to use it. Royal icing begins to dry when exposed to air. The best way to store unused icing is in an airtight container. For small amounts, even a zip-top bag with the air squeezed out works.
When storing in a bowl or larger container, press a layer of plastic wrap directly onto the surface of the icing. Ensure the wrap is touching every part of the surface to prevent any air pockets. Then, place a lid on the container. Stored this way at room temperature, royal icing can typically last for 1-2 weeks. If storing for longer, it can be refrigerated for up to a month or even frozen for several months, though freezing can sometimes affect the texture slightly upon thawing. Always bring refrigerated or frozen icing back to room temperature before using.
Rehydrating and Adjusting Stored Icing
Even with proper storage, royal icing can sometimes thicken slightly over time, especially if refrigerated. Before using stored icing, always check its consistency. Give it a good stir with a spatula. If it feels too thick or stiff for the consistency you need (outline, flood, etc. ), you'll need to rehydrate and adjust it.
Add liquid (water is best) very slowly, just a few drops at a time, stirring thoroughly after each addition. It might take a minute or two of stirring for the added liquid to fully incorporate and affect the consistency. Continue adding tiny amounts of water and stirring until you reach the desired flow for your decorating task.
For example, if you stored flood icing and it's now too thick, add just 1/4 teaspoon of water, stir for a minute, test, and repeat if necessary. This process is very similar to the initial thinning steps and is a routine part of royal icing consistency troubleshooting when working with pre-made icing. If the icing was frozen, ensure it's fully thawed and stirred well before checking and adjusting consistency.
Frequently Asked Questions
Royal icing typically requires three main consistencies: outlining consistency, flood consistency, and sometimes a detail consistency. Each serves a specific purpose in creating intricate designs.
How can I tell if my royal icing is too thick?
If your royal icing is too thick, it will be difficult to pipe smoothly and will not spread evenly. You'll notice pronounced peaks when lifting your spatula and the icing will take a very long time to settle.
What's the best way to thin royal icing that's too thick?
The best way to thin royal icing is by adding small amounts of water (a few drops at a time) and thoroughly mixing until you reach the desired consistency. Be careful not to add too much water at once.
Color bleeding can be prevented by ensuring your flood consistency is not too thin. Also, allow the outlining icing to completely dry before flooding.
What does "count consistency" mean in royal icing recipes?
"Count consistency" refers to the time it takes for a line drawn in the royal icing to disappear back into itself. This measurement helps you determine the perfect flood consistency needed for smooth and even coverage.
Final Reflection: Mastering the Art of Royal Icing Consistency
The pursuit of the perfect royal icing consistency is not merely a technical challenge; it's the key that unlocks a world of breathtaking cookie artistry. Achieving that ideal consistency, as we've explored throughout this article, transforms a simple cookie into a miniature masterpiece, capable of showcasing intricate details and stunning designs. This isn't just about following a recipe; it's about understanding the nuances of the ingredients and the subtle shifts in texture that dictate success or failure.
The journey to mastering royal icing consistency is a continuous one, mirroring the ever-evolving landscape of baking itself. Each batch presents a unique learning opportunity, a chance to refine technique and deepen understanding. The frustration of a runny icing or a frustratingly stiff one is ultimately a stepping stone to greater mastery. As the renowned pastry chef, Pierre Hermé, once said, Baking is a science, but it's also an art. It's about precision, but it's also about feeling.
This perfectly encapsulates the delicate balance between technical skill and intuitive understanding required to consistently achieve the perfect royal icing.
Now, it's your turn. Don't be discouraged by initial challenges; embrace them as opportunities for growth. Experiment with different techniques, analyze your results, and refine your approach with each batch. Remember the principles outlined in this article, and trust your instincts. The journey to creating stunning cookie details with royal icing is a rewarding one, filled with the satisfaction of transforming simple ingredients into works of edible art. So, grab your mixing bowls, gather your ingredients, and let your creativity flow. The perfect consistency awaits!
Thanks for taking the time to explore the world of advanced royal icing consistency! We hope you now feel confident in creating stunning cookie details. Ready to put your new skills to the test?
- Create your masterpiece! Use your newfound knowledge to decorate a batch of cookies—push your creative boundaries and see what amazing details you can achieve.
- Share your cookie creations! Post photos on social media and tag us—we'd love to see your stunning results!
- Dive deeper: Explore our other tutorials on advanced cake decorating techniques to further expand your baking artistry!
What incredible cookie designs will you bring to life today?