
Impress Your Friends: Simple SliceandBake Cookies That Look Fancy

Welcome to BakeWithEase, your baking sanctuary!
Ever dreamt of effortlessly creating bakery-worthy treats? You're in the right place. Today, we're diving into the surprisingly simple world of Easy Slice and Bake Cookies. These aren't your average cookies; they're the secret weapon for impressive desserts with minimal effort. Intrigued? Discover how to transform a few ingredients into stunning, shareable delights and unlock the baker within. Let's get started!
- Elevate Your Baking: Slice-and-Bake Cookies for Impressive Results
- A Guide to Effortless Slice and Bake Cookies
- The Appeal of Slice-and-Bake Cookies
- Achieving Visually Stunning Slice and Bake Cookies
- Recipes to Impress: Slice and Bake Cookie Creations
- Perfecting the Bake: Achieving Consistent Results
- Enhancing Your Slice and Bake Cookies: Tips and Tricks
- Troubleshooting Common Slice and Bake Challenges
- Savoring Your Homemade Slice and Bake Cookies
- Expanding Your Baking Repertoire: A Continued Journey
- Frequently Asked Questions
- Final Reflection: The Unexpected Joy of Effortless Elegance
- Unleash Your Inner Pastry Chef!
Discover the Simplicity of Slice and Bake Baking
Baking doesn't always require hours of intricate steps and a pile of dirty dishes. The beauty of easy slice and bake cookies lies in their straightforward process. You prepare a dough, shape it into a log, chill it, and then simply slice and bake. This method significantly reduces the time commitment compared to rolling out dough and cutting individual shapes, making it perfect for busy schedules or spontaneous baking urges. Imagine having perfectly portioned cookie dough ready in your refrigerator, waiting to be transformed into warm, delicious treats in just minutes.
This technique is a cornerstone for mastering easy slice and bake baking. It allows you to focus on the fundamentals of dough preparation and chilling, rather than the sometimes-fussy process of rolling and cutting. Many classic cookie styles, from simple butter cookies to more elaborate pinwheels and checkerboards, can be adapted to the slice-and-bake method. This accessibility makes it an ideal starting point for beginners looking to build confidence in the kitchen, while still offering enough versatility for more experienced bakers to experiment with flavors and designs.
Convenience and Elegance with Minimal Effort
The primary draw of slice and bake cookies is undoubtedly the convenience. You can make a batch of dough days, or even weeks, in advance and store it chilled or frozen. This means you're always just a few slices away from freshly baked cookies. For instance, if unexpected guests arrive, you can have warm cookies ready in under 15 minutes, including baking time. This proactive approach to baking saves time and stress when you need a quick dessert or a sweet snack.
Beyond convenience, these cookies can achieve a surprising level of elegance with minimal effort. The uniform shapes created by slicing a chilled log provide a neat, professional appearance. Techniques like swirling, marbling, or creating checkerboard patterns within the dough log elevate the visual appeal dramatically. What looks like a complex bakery-style cookie is often just a clever arrangement of different dough colors or flavors rolled together before chilling. This combination of ease and impressive results makes simple slice and bake cookies a go-to for home bakers.
Ideal for All Bakers: Accessible and Rewarding
Easy slice and bake cookies are incredibly accessible, making them a fantastic entry point for novice bakers. The steps are intuitive: mix ingredients, form a log, chill, slice, and bake. There's no need for special cutters or extensive dough handling skills like tempering or intricate piping. A simple knife and baking sheet are often all that's required. This low barrier to entry encourages newcomers to try their hand at baking, leading to rewarding outcomes that build confidence.
For experienced bakers, the slice-and-bake format offers a canvas for creativity and efficiency. They can experiment with complex flavor combinations, incorporate various mix-ins like nuts or dried fruit, or master intricate dough patterns. Preparing multiple dough logs ahead of time allows for quick baking of diverse cookie types, perfect for holiday platters or bake sales. Whether you're baking your very first batch or refining a signature recipe, easy slice and bake cookies provide a satisfying and versatile baking experience.
Dough Fundamentals: Ingredients and Techniques
Creating beautiful slice and bake cookies starts with the dough itself. The balance of ingredients is crucial for achieving the right texture – firm enough to slice cleanly when chilled, but tender and delicious after baking. A standard recipe typically includes flour, sugar, butter, eggs, and flavorings. Precision in measuring these ingredients, especially the flour and butter, is key. Using a kitchen scale for accuracy can make a significant difference in consistency from batch to batch.
The technique of creaming butter and sugar is fundamental here. It incorporates air, which contributes to the cookie's texture. However, overmixing once the flour is added can develop too much gluten, resulting in tough cookies. The goal is a dough that comes together but isn't overly sticky or dry. Chilling the dough is perhaps the single most critical step; it solidifies the fats, making the dough firm enough to slice without distorting its shape, which is essential for visually appealing easy slice and bake cookies.
Selecting the Ideal Flour for Slice and Bake Cookies
For most slice and bake cookies, all-purpose flour is the standard choice. Its moderate protein content (typically 10-12%) provides structure without making the cookies too tough. Using bleached or unbleached doesn't usually make a significant difference in this application, but consistency is important. Some recipes might call for a lower protein flour, like cake flour (around 8%), for a more tender crumb, or a mix of all-purpose and a specialty flour like almond flour for added flavor and texture.
Accuracy in measuring flour is vital. Too much flour can result in dry, crumbly cookies that spread minimally during baking, potentially losing defined patterns. Too little can cause excessive spreading, blurring designs and making the cookies thin and greasy. A common technique is the "spoon and level" method: lightly spoon flour into your measuring cup until it overflows, then level off the excess with a straight edge.
The Crucial Role of Cold Butter in Dough Preparation
Cold butter is indispensable for successful slice and bake cookies. When you cream cold butter with sugar, tiny pockets of air are created. As the cookies bake, this trapped air expands, contributing to the cookie's lift and texture. More importantly for this specific method, cold butter helps the dough maintain its shape during chilling and slicing.
Using softened or melted butter would result in a much softer dough that is difficult to form into a log and impossible to slice cleanly without it squishing. The cold, firm butter ensures that the log holds its structure in the refrigerator. During baking, the cold butter slowly melts, creating steam that further lifts the cookie and contributes to flakiness, while the fat prevents excessive spreading too quickly, thus preserving the intricate patterns you might have created.
Once your dough is prepared, shaping is where the magic happens for visually stunning easy slice and bake cookies. The dough needs to be pliable enough to work with but not so warm that it becomes sticky. Often, dividing the dough and working with smaller portions makes shaping easier. Rolling the dough into logs can be done by hand or by using parchment paper or plastic wrap to help guide and tighten the log.
Uniformity in the log's diameter is key to ensure that all your cookies are roughly the same size and bake evenly. Aim for a consistent thickness, typically between 1.5 to 2 inches (about 4-5 cm) in diameter, depending on your desired cookie size. For more complex patterns, you might roll sheets of dough and layer them before forming the log, or combine different colored doughs.
Creating Spirals and Designs in Your Dough
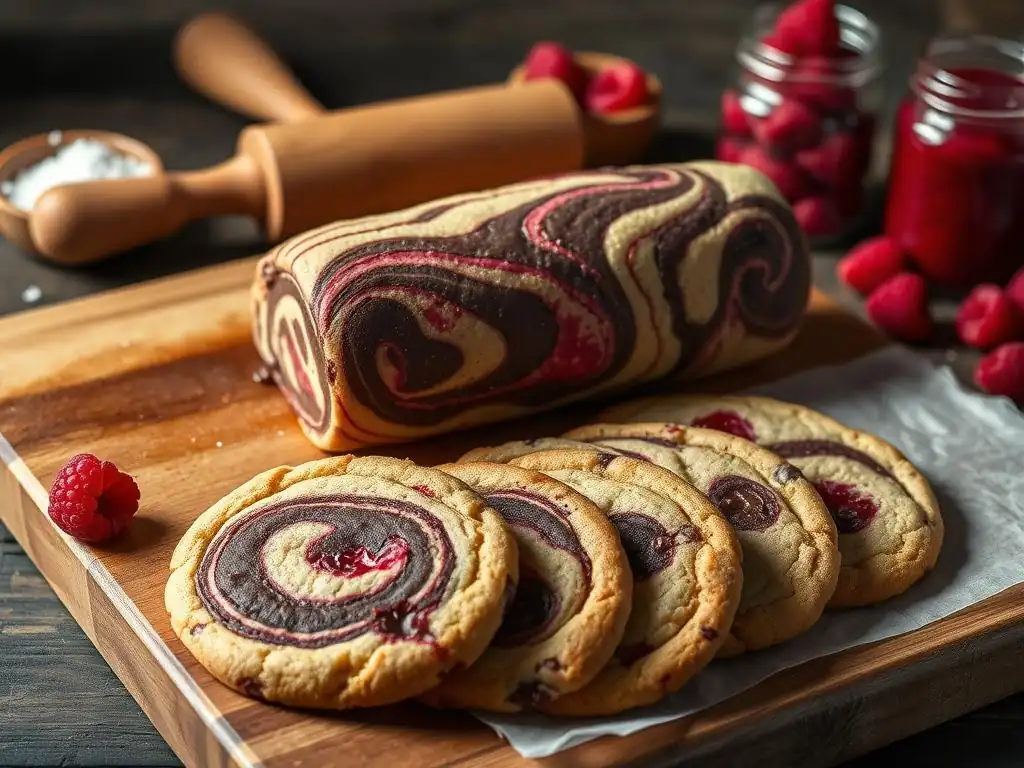
Creating spirals, pinwheels, or other designs involves combining different colors or flavors of dough. A classic pinwheel uses two contrasting doughs, often vanilla and chocolate. You roll each dough into a rectangle of equal size and thickness, then layer one on top of the other. Tightly rolling this layered sheet from one end to the other creates the spiral effect.
For more intricate designs, like checkerboards, you might cut strips of contrasting doughs and assemble them into a square pattern before encasing them in another layer of dough and rolling into a log. The key is to ensure good adhesion between the different doughs so they don't separate during slicing or baking. Gently pressing the layers together before rolling the log helps achieve this.
Achieving Marbled Effects for Unique Cookies
Marbling offers a beautiful, organic look to slice and bake cookies. It's often achieved by gently swirling together two or more contrasting doughs. You might take chunks of different colored doughs, lightly twist or fold them together, and then gently form them into a log. The goal is not to fully combine the colors, but to create streaks and swirls.
Be careful not to overwork the dough when marbling, as this will blend the colors completely and you'll lose the distinct marbled effect. A few gentle folds or twists are usually sufficient before shaping the log. This technique is fantastic for using up small amounts of leftover doughs or creating visually interesting cookies with minimal effort, perfect for easy slice and bake baking.
Mastering Uniform Shapes Through Log Rolling
Achieving uniform, round logs is essential for consistent slicing and baking. After combining your dough(s), gather the dough into a rough log shape. Place it on a piece of parchment paper or plastic wrap. Use the paper or wrap to help you roll and tighten the log, applying gentle, even pressure from the center outwards. You can also use a ruler or the edge of your counter to help shape a straight log.
For perfectly round logs, you can use a sushi mat or a log-shaping tool. Roll the log back and forth on a flat surface while applying slight pressure with the paper or wrap until it reaches your desired diameter and is smooth and even. This step ensures that each slice yields a cookie of the same size and shape, contributing to a professional-looking batch of easy slice and bake cookies.
Ready to put these techniques into practice? Here are a few recipes for impressive slice and bake cookies that are surprisingly simple to make. These recipes showcase different shaping techniques and delicious flavor combinations. Remember to chill the dough logs thoroughly, ideally for at least 2 hours, or up to 3 days, before slicing for the best results. Freezing the logs for about 30 minutes before slicing can also help achieve extra clean cuts.
These cookies combine rich chocolate dough with a nutty hazelnut counterpart, swirled together for a beautiful effect. They yield approximately 3 dozen cookies.
Ingredients for Chocolate Hazelnut Swirl Cookies
1 cup (2 sticks)unsalted butter, cold and cubed3/4 cupgranulated sugar1/4 cuppacked light brown sugar1 largeegg1 teaspoonvanilla extract2 1/2 cupsall-purpose flour1/2 teaspoonbaking powder1/4 teaspoonsalt1/4 cupunsweetened cocoa powder1/2 cupfinely ground toasted hazelnuts (hazelnut flour works too)
Step-by-Step Instructions for Chocolate Hazelnut Swirl Cookies
- In a large bowl, cream the cold butter and sugars until just combined. Don't over-cream.
- Beat in the egg and vanilla extract until just incorporated.
- In a separate bowl, whisk together the flour, baking powder, and salt.
- Divide the butter mixture evenly into two bowls.
- To one bowl, add the cocoa powder and mix until just combined into a chocolate dough.
- To the second bowl, add the ground hazelnuts and mix until just combined into a hazelnut dough.
- Shape each dough into a rough rectangle, wrap in plastic wrap, and chill for 30 minutes.
- On a lightly floured surface or between two sheets of parchment paper, roll each dough rectangle to about
1/8 inchthickness, roughly10x12 inches. - Peel the top parchment from the hazelnut dough and invert it onto the chocolate dough rectangle. Peel off the remaining parchment.
- Starting from a long edge, tightly roll the layered dough into a log.
- Wrap the log tightly in plastic wrap, pressing gently to remove any air pockets and ensure it's round.
- Chill the log for at least 2 hours, or until very firm.
- Preheat oven to
350°F (175°C). Line baking sheets with parchment paper. - Using a sharp knife, slice the log into
1/4-inchthick rounds. - Place slices about
1 inchapart on prepared baking sheets. - Bake for
10-12 minutes, or until edges are lightly golden and centers look set. - Let cool on baking sheets for a few minutes before transferring to a wire rack to cool completely.
Bright and zesty, these pinwheels are a delightful twist on classic easy slice and bake cookies. This recipe makes about 30-36 cookies.
Ingredients for Lemon Poppy Seed Pinwheel Cookies
1 cup (2 sticks)unsalted butter, cold and cubed1 1/4 cupsgranulated sugar1 largeegg1 teaspoonvanilla extract1 teaspoonlemon extract (or zest of 1 large lemon)2 3/4 cupsall-purpose flour1/2 teaspoonbaking powder1/4 teaspoonsalt3 tablespoonspoppy seeds- Optional: Yellow food coloring
Step-by-Step Instructions for Lemon Poppy Seed Pinwheel Cookies
- In a large bowl, cream the cold butter and sugar until just combined.
- Beat in the egg, vanilla extract, and lemon extract/zest.
- In a separate bowl, whisk together the flour, baking powder, and salt.
- Gradually add the dry ingredients to the wet ingredients, mixing until just combined.
- Divide the dough in half.
- To one half, add the poppy seeds and mix until evenly distributed. Add a drop or two of yellow food coloring if desired for contrast.
- Shape each dough half into a rough rectangle, wrap, and chill for 30 minutes.
- On a lightly floured surface or between parchment paper, roll each dough rectangle to about
1/8 inchthickness, roughly10x12 inches. - Peel the top parchment from the poppy seed dough and invert it onto the plain lemon dough rectangle. Peel off the remaining parchment.
- Starting from a long edge, tightly roll the layered dough into a log.
- Wrap the log tightly in plastic wrap, pressing gently to shape.
- Chill the log for at least 2 hours, or until very firm.
- Preheat oven to
350°F (175°C). Line baking sheets with parchment paper. - Using a sharp knife, slice the log into
1/4-inchthick rounds. - Place slices about
1 inchapart on prepared baking sheets. - Bake for
10-12 minutes, or until edges are lightly golden. - Let cool on baking sheets for a few minutes before transferring to a wire rack.
These cookies feature the delightful combination of almond and tart dried cherries, offering a chewy texture and vibrant color within each slice of these simple slice and bake cookies. Yields around 3 dozen cookies.
Ingredients for Almond and Cherry Cookies
1 cup (2 sticks)unsalted butter, cold and cubed1 cupgranulated sugar1/4 cupalmond paste, crumbled1 largeegg1 teaspoonalmond extract2 1/2 cupsall-purpose flour1/2 teaspoonbaking powder1/4 teaspoonsalt3/4 cupchopped dried tart cherries
Step-by-Step Instructions for Almond and Cherry Cookies
- In a large bowl, cream the cold butter, sugar, and crumbled almond paste until just combined.
- Beat in the egg and almond extract until incorporated.
- In a separate bowl, whisk together the flour, baking powder, and salt.
- Gradually add the dry ingredients to the wet ingredients, mixing until just combined.
- Stir in the chopped dried cherries.
- Turn the dough out onto a piece of plastic wrap or parchment paper.
- Shape the dough into a log, roughly
1.5 to 2 inchesin diameter, using the wrap to help tighten and shape it. - Wrap the log tightly.
- Chill the log for at least 2 hours, or until very firm.
- Preheat oven to
350°F (175°C). Line baking sheets with parchment paper. - Using a sharp knife, slice the log into
1/4-inchthick rounds. - Place slices about
1 inchapart on prepared baking sheets. - Bake for
11-13 minutes, or until edges are lightly golden. - Let cool on baking sheets for a few minutes before transferring to a wire rack.
Perfecting the Bake: Achieving Consistent Results
Baking slice and bake cookies correctly is the final step to ensuring they look and taste their best. Even with perfectly formed and chilled dough logs, the baking process can make or break the final cookie. Factors like oven temperature, baking time, and proper cooling all play a significant role in achieving that ideal texture and maintaining the cookie's shape and visual appeal.
Using an oven thermometer is highly recommended, as many ovens' internal thermostats are inaccurate by as much as 25-50°F (around 15-25°C). Baking at the correct temperature ensures even cooking and proper spread. Overcrowding the baking sheet can also lead to uneven baking, so give your cookies space.
Optimal Oven Temperature and Baking Time
For most standard cookie doughs, 350°F (175°C) is the optimal temperature. This temperature allows the cookies to bake through evenly without burning the edges before the center is done. Baking at a slightly lower temperature, say 325°F (160°C), might be necessary for very large cookies or ovens that run hot, helping to prevent excessive spread.
Baking time typically ranges from 10 to 14 minutes, depending on the thickness of your slices and your oven. You know they are done when the edges are lightly golden brown and the centers look set, not wet or glossy. They might still look slightly soft in the very center; they will firm up as they cool. Undercooking slightly results in a chewier cookie, while longer baking yields a crispier one. Keep a close eye on them, as the difference between perfectly baked and overdone can be just a minute or two.
Excessive spreading is a common issue with slice and bake cookies, often blurring the beautiful patterns you worked to create. The most effective way to prevent this is thorough chilling of the dough log. A minimum of 2 hours is usually required, but chilling overnight or even longer is better. The colder and firmer the dough, the less it will spread initially in the hot oven.
Other factors contributing to spread include using softened butter instead of cold, too much sugar, too little flour, or baking on warm baking sheets. Ensure your baking sheets are cool before placing dough slices on them. If your dough is consistently spreading too much, try adding a couple more tablespoons of flour to the recipe or chilling the dough for a longer period, perhaps freezing the log for 20-30 minutes before slicing and baking.
Cooling and Storing Your Baked Creations
Once out of the oven, allow the slice and bake cookies to rest on the hot baking sheet for 2-5 minutes. This allows them to set up slightly, making them less likely to break when moved. Then, carefully transfer them to a wire rack to cool completely. Cooling on a rack allows air circulation, preventing the bottoms from becoming soggy.
Store cooled cookies in an airtight container at room temperature. Most butter-based cookies stay fresh for 3-5 days. If you've made a large batch or won't eat them all quickly, baked cookies freeze well for up to 2-3 months. Layer them between sheets of parchment paper in a freezer-safe container. Dough logs can also be frozen for up to 3 months; simply thaw slightly in the refrigerator before slicing and baking as usual, perhaps adding a minute or two to the baking time.
Making easy slice and bake cookies is a fantastic foundation, but there are always ways to elevate them further. Simple additions or finishing touches can transform a basic cookie into something truly special, adding extra layers of flavor or visual appeal. Don't be afraid to experiment once you've mastered the basic technique.
Consider the flavor profile of your dough and how you can complement or contrast it. A little extra salt can enhance sweetness, while a pinch of spice can add warmth. Think about texture too – incorporating chopped nuts, chocolate chips, or even crushed toffee bits into the dough can provide a delightful crunch or chewiness.
Incorporating Extracts and Flavors for Depth
Extracts are a simple way to add significant flavor to your slice and bake cookies. Beyond classic vanilla, almond extract pairs wonderfully with cherry or chocolate, lemon extract brightens fruity or plain doughs, and peppermint extract is perfect for chocolate combinations, especially around the holidays. Use high-quality extracts for the best flavor. Typically, a teaspoon of extract is sufficient for a standard batch of dough.
Other flavoring agents include citrus zest (lemon, orange, lime), ground spices (cinnamon, nutmeg, cardamom), or even instant espresso powder for a coffee kick in chocolate doughs. Swirling in a bit of fruit jam or nut butter before rolling the log can also create delightful flavor pockets within your simple slice and bake cookies.
Decorating Techniques for Added Flair
Decorating slice and bake cookies can be as simple or as elaborate as you like. Since the shapes are already uniform and often have inherent patterns, extensive decoration isn't necessary, but a few touches can make them truly stand out. Dipping half a cookie in melted chocolate or drizzling a simple glaze adds both flavor and visual interest.
For a touch of sparkle or color before baking, you can roll the exterior of your chilled dough log in coarse sugar (like turbinado or sanding sugar), sprinkles, or finely chopped nuts before slicing. This creates a beautiful crust around the edge of each cookie slice as it bakes. This is an incredibly easy way to make easy slice and bake cookies look festive.
Simple Icing Recipes for Cookies
A basic glaze or icing can add a sweet finish. A simple powdered sugar glaze can be made by whisking together 1 cup powdered sugar with 1-3 tablespoons milk or lemon juice until it reaches a drizzling or dipping consistency. Add a splash of vanilla or almond extract for extra flavor.
For a slightly more structured icing, you can make a simple royal icing by whisking powdered sugar with a small amount of meringue powder and water. This icing dries hard, making the cookies stackable and shippable. You can color these icings with food coloring to match the occasion or the cookie flavor.
Decorative Sugars and Toppings for a Festive Look
Rolling the chilled dough log in decorative sugars before slicing is perhaps the easiest way to add sparkle and texture. Coarse sanding sugars in various colors stick well to the dough and maintain their shape and color during baking. Turbinado sugar provides a larger crystal and a slight caramel flavor.
Other toppings to roll the log in include finely chopped nuts (like pistachios for a green edge or pecans for a brown edge), sprinkles (jimmies or nonpareils), or even crushed cookie crumbs. Press the topping firmly onto the outside of the log before slicing to ensure it adheres well. This simple step instantly elevates the look of your easy slice and bake cookies.
Troubleshooting Common Slice and Bake Challenges
Even with the simplicity of the method, you might occasionally encounter issues when making slice and bake cookies. Don't get discouraged! Understanding the common problems and their solutions will help you achieve perfect results every time and ensure your easy slice and bake baking is always successful.
Most issues stem from dough consistency or chilling time. Being able to diagnose whether your dough is too sticky, too crumbly, or spreading too much is key to correcting it before or during the baking process.
Addressing Sticky Dough: Solutions and Prevention
Sticky dough is often a result of too little flour, too much butter, or insufficient chilling. If your dough is too sticky to handle or shape into a log after mixing, try adding a tablespoon or two of flour at a time, mixing until it's just incorporated and the dough is less sticky but still soft. Be careful not to add too much flour, which will result in dry cookies.
Prevention is easier: measure your ingredients accurately, particularly the flour. Ensure your butter is cold and not softened. If the dough feels too soft after mixing, even with correct measurements, chilling it for 30 minutes before attempting to shape the log can make it much more manageable. If the shaped log is sticky, wrap it well and chill until very firm before slicing.
Understanding and Preventing Excessive Spreading
As mentioned earlier, excessive spread blurs patterns and yields thin, often crispy cookies. The primary culprits are warm dough, too much butter, or too little flour. Ensure your dough log is thoroughly chilled – the colder, the better for maintaining shape during the initial phase of baking. Freezing the log for 20-30 minutes before slicing is a great preventative measure.
Using cold butter is crucial. If your kitchen is warm, the dough might soften quickly as you work with it; pop it back in the fridge periodically if needed. If you suspect your recipe consistently yields flat cookies, try slightly increasing the flour (by 1-2 tablespoons per batch) or slightly decreasing the sugar or butter in future batches.
Achieving Clean Slices: Techniques and Tips
Getting clean, crisp slices is essential for showcasing the patterns in your slice and bake cookies. This relies almost entirely on the dough log being sufficiently chilled and firm. If the log is too soft, slicing will squish and distort the shape.
Use a sharp knife, preferably a large chef's knife or a serrated knife, and use a decisive, downward motion rather than sawing back and forth. For very firm logs, you might need to press down firmly. Wiping the knife blade clean between slices, especially when working with sticky or chocolate doughs, can also help achieve cleaner cuts. If your log is crumbling instead of slicing cleanly, it might be too cold or dry; let it sit at room temperature for just a few minutes to soften slightly before trying again.
You've mastered the dough, perfected the shape, and baked them beautifully – now it's time to enjoy the fruits of your labor! Easy slice and bake cookies are perfect for sharing, gifting, or simply treating yourself. The satisfaction of pulling a tray of these uniform, often visually striking, cookies from the oven is immense.
Take a moment to admire the patterns you created and enjoy the wonderful aroma filling your kitchen. Whether they are simple vanilla rounds or intricate pinwheels, each cookie represents a bit of effortless baking magic.
Serving Ideas for Gatherings and Gifts
Because of their uniform shape and often impressive patterns, slice and bake cookies are ideal for serving at parties, potlucks, or family gatherings. Arrange a variety of different flavors or designs on a platter for a stunning presentation. They pair wonderfully with coffee, tea, or a cold glass of milk.
They also make fantastic homemade gifts. Stack different types of simple slice and bake cookies in cellophane bags tied with ribbon, or layer them in decorative tins. The ability to bake just the right amount means you can always provide fresh cookies for any occasion.
Don't forget to show off your beautiful easy slice and bake cookies! Snap a photo of your finished batch or a close-up of a particularly striking pattern. Sharing your baking successes online can inspire others to try this accessible and rewarding method.
Use relevant hashtags to connect with other bakers and cookie enthusiasts. It's a great way to receive compliments, share tips, and become part of the vibrant online baking community. Celebrate your achievement in mastering simple slice and bake baking!
Expanding Your Baking Repertoire: A Continued Journey
Mastering easy slice and bake cookies is a significant step in your baking journey. You've learned fundamental dough techniques, the importance of chilling, and how to create visually appealing results with minimal fuss. This knowledge is transferable to many other types of cookies and baked goods.
Consider trying other simple cookie recipes, exploring different flavor combinations for your slice-and-bake doughs, or even tackling slightly more complex baked goods. The confidence gained from successfully making beautiful and delicious cookies using this accessible method will encourage you to keep exploring and expanding your skills in the kitchen. Happy baking!
Frequently Asked Questions
Slice-and-bake cookies are cookies where the dough is formed into a log, chilled, and then sliced into rounds before baking. This method offers ease and convenience in cookie preparation.
Yes! Their straightforward method makes them ideal for beginners. There's minimal fuss and the recipes are usually very easy to follow.
Absolutely! Freezing the dough log is a great way to prepare ahead of time. Just wrap it well and thaw slightly before slicing and baking.
The possibilities are endless! You can add chocolate chips, nuts, dried fruit, spices, or even extracts to customize the flavor to your liking. It's all about personalizing your bake.
Chilling the dough log completely before slicing is crucial. Also, avoid over-creaming the butter and sugar, and ensure your oven is at the correct temperature.
Final Reflection: The Unexpected Joy of Effortless Elegance
The simplicity of slice-and-bake cookies belies their surprising power to impress. These aren't just easy treats; they're a gateway to creating memorable moments, proving that deliciousness and sophistication don't require hours in the kitchen. The ease of preparation allows for spontaneous baking, transforming an ordinary afternoon into a delightful occasion.
The enduring appeal of homemade cookies lies not just in their taste, but in the feeling of connection they foster. They're a tangible expression of care, a small gesture that can brighten someone's day. As the saying goes, The best things in life are simple,
and these cookies are a perfect embodiment of that truth. They've allowed me to share joy with friends and family, creating lasting memories around a simple, shared experience. The positive feedback I've received, the smiles on faces after a bite, have solidified the importance of this seemingly small act of baking.
So, I encourage you: Don't underestimate the power of a simple, beautifully presented cookie. Try your hand at these recipes, experiment with flavors and decorations, and watch as you transform ordinary ingredients into extraordinary moments. Let the ease of the process empower you to share the joy of baking with those you love, creating connections and memories that will last far longer than the cookies themselves. The world needs more simple joys, and these cookies are a delicious starting point.
Unleash Your Inner Pastry Chef!
Thanks for taking the time to explore these simple yet stunning slice-and-bake cookies! You've just unlocked the secret to effortlessly impressive desserts. Now it's time to put your new skills to the test.
- Bake a batch today: Grab your favorite cookie dough, and let's create some show-stopping treats! Don't forget to experiment with different shapes and toppings for unique results.
- Share your creations: Show off your baking prowess on social media using #BakeWithEase and tag us! We'd love to see your cookie masterpieces.
- Try a new flavor profile: Challenge yourself to create your own unique cookie flavor combination using the techniques you just learned. Think lavender honey, or spicy cinnamon swirl – the possibilities are endless!
Ready to transform your baking game and impress everyone you know? What exciting flavor combination will you create first?