
The Baker's Secret: Perfecting Pâte à Choux Texture

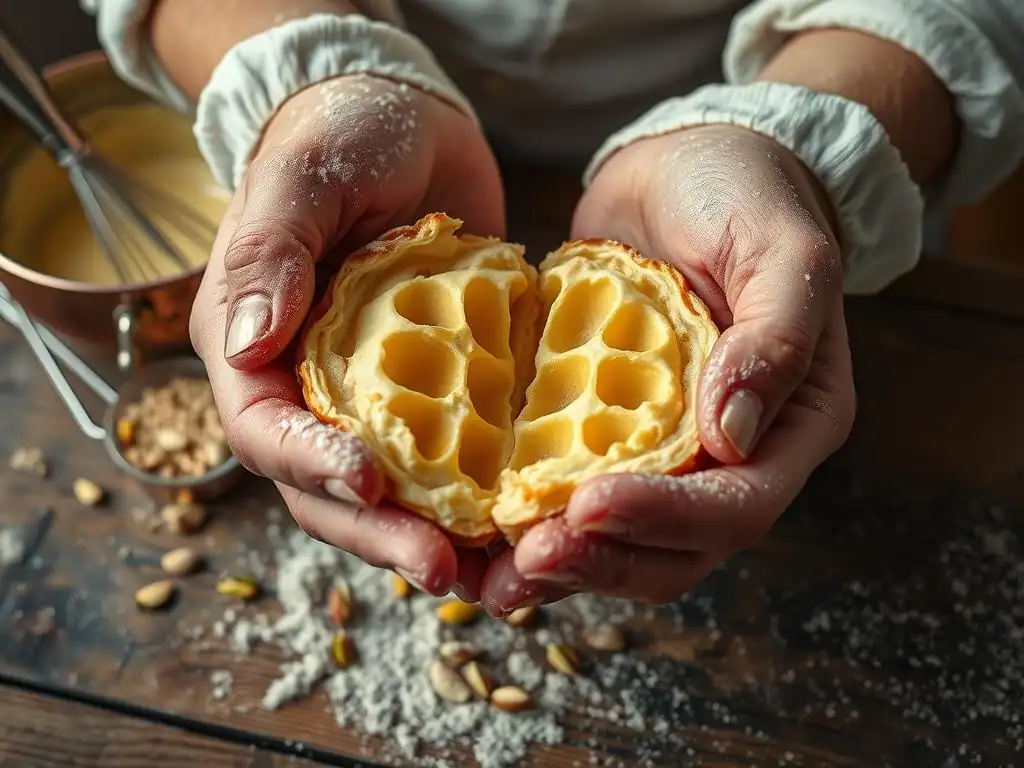
Welcome to BakeWithEase, where mastering the art of baking becomes a delightful journey! Are you ready to unlock the secret to achieving that elusive, ethereal lightness in your pastries? This week, we're diving deep into perfect pâte à choux texture – a skill that will elevate your baking from good to extraordinary. Discover the secrets that separate the experts from the amateurs and prepare to create airy delights that will leave everyone wanting more. Curious to know how? Let's get baking!
- Introduction to Pâte à Choux and Achieving Ideal Texture
- Understanding the Key Ingredients for Perfect Pâte à Choux
- The Step-by-Step Guide to Achieving Perfect Pâte à Choux Texture
- Troubleshooting Common Pâte à Choux Problems
- Baking Techniques for Optimal Sourdough Crumb
- Baking Techniques for Optimal Pâte à Choux Texture
- Mastering Sourdough: Beyond the Basics
- Mastering Pâte à Choux: Beyond the Basics
- Sourdough Recipe: The Sourdough School's Foolproof Formula for Perfect Crumb
- Pâte à Choux Recipe: A Foolproof Formula for Perfect Texture
- Conclusion: Unlock the Secrets to Perfect Sourdough Crumb with The Sourdough School
- Conclusion: Unlock the Secrets to Perfect Pâte à Choux Texture
-
Frequently Asked Questions
- What exactly is pâte à choux and why is its texture so important?
- What are the key ingredients in pâte à choux and how do they contribute to its texture?
- What are some common mistakes that lead to a poor pâte à choux texture?
- How do I know when my pâte à choux dough is the right consistency?
- How can I troubleshoot pâte à choux that didn't rise properly?
- Final Reflection: The Enduring Allure of Perfect Pâte à Choux
- Unleash Your Inner Pâtissier: Master the Perfect Choux!
Introduction to Pâte à Choux and Achieving Ideal Texture
Why Perfect Texture Matters for Choux Pastry
Achieving the perfect pâte à choux texture is paramount for successful choux pastries like éclairs, profiteroles, and gougères. The hallmark of well-made pâte à choux is a crisp, golden-brown exterior shell and a large, hollow interior cavity. This internal space is essential for filling, whether with sweet creams, savory mousses, or ice cream. A pastry that is dense, flat, or soggy inside simply doesn't offer the delightful contrast and structural integrity required for classic choux applications.
Imagine biting into a profiterole only to find a heavy, uncooked dough center instead of a light, airy void – it's a significant disappointment. The ideal texture ensures the pastry holds its shape, puffs dramatically in the oven, and provides the perfect vessel for fillings, elevating a simple dessert or appetizer to a truly memorable experience. Without the correct texture, the pastry fails its fundamental purpose.
Moreover, the texture directly impacts the pastry's shelf life and usability. A properly baked choux pastry with a dry, crisp shell will stay fresh longer and resist becoming soggy when filled, at least for a reasonable period. In contrast, choux with a moist or undercooked interior can collapse quickly, become unpleasantly chewy, or even develop mold faster.
Pastry chefs often aim for a shell that is firm enough to hold its shape under the weight of fillings like pastry cream (which can weigh around 15-20 grams per average éclair) but delicate enough to yield easily when bitten. This balance is a key indicator of mastery in achieving the perfect pâte à choux texture.
Mastering Pâte à Choux: A Guide to Ideal Results
Mastering the art of pâte à choux involves understanding the science behind its unique puffing action and meticulously controlling each stage of the process. Unlike many other doughs, pâte à choux relies on steam expansion for its rise, trapped within a rigid, cooked paste. Achieving the perfect pâte à choux texture is a skill that develops with practice, but it starts with foundational knowledge.
The key stages include properly cooking the flour-liquid-butter base (the panade), incorporating eggs to create a smooth, elastic paste, and baking at precise temperatures to encourage maximum steam leavening and shell development. Even experienced bakers sometimes face challenges, as factors like oven calibration (a difference of just 10-15°C can impact results significantly), ingredient temperature, and even humidity can influence the outcome.
This guide aims to break down these complexities, offering clear steps and insights to help you consistently achieve that desirable crisp exterior and hollow interior. We'll explore how ingredient ratios influence the final dough consistency and how specific techniques during mixing, piping, and baking contribute to the perfect pâte à choux texture.
By focusing on these details, you can move beyond simply following a recipe to truly understanding the 'why' behind each step, allowing you to troubleshoot issues and adapt techniques as needed. Whether you're making delicate cream puffs requiring a thin, crisp shell or sturdy savory gougères that need to hold cheese, the principles for achieving the ideal texture remain the same.
Understanding the Key Ingredients for Perfect Pâte à Choux
Flour Selection: The Foundation of Your Pastry
The type of flour used plays a critical role in developing the structure needed for perfect pâte à choux texture. All-purpose flour is the standard choice for pâte à choux due to its moderate protein content, typically ranging from 10-12%. This protein develops into gluten when hydrated and cooked, forming a network that is strong enough to trap the steam generated during baking, yet not so strong that it prevents expansion.
Using a flour that is too low in protein, like cake flour (around 8-9% protein), might result in a weaker structure that collapses easily after baking. Conversely, using a high-protein bread flour (12-14% protein) can lead to a tougher pastry with a less tender interior. The starch in the flour also gelatinizes during the initial cooking phase, creating the thick paste (panade) that is the base of the dough.
For best results, use unbleached all-purpose flour. Bleached flour can sometimes interfere with gluten development and starch gelatinization due to the chemicals used in processing. While the difference might seem subtle, using a consistent, good-quality all-purpose flour provides a reliable foundation for achieving the desired puff and the perfect pâte à choux texture. Some recipes might specify pastry flour for a slightly more tender result, but all-purpose is generally forgiving and widely available. Ensuring the flour is fresh is also important, as stale flour can absorb liquid differently and impact the final consistency.
Water/Milk's Role in Dough Consistency
The liquid component in pâte à choux, whether water, milk, or a combination, significantly impacts the final dough consistency and the resulting texture. Water is commonly used because it creates a crispier shell. When water turns to steam during baking, it expands rapidly, creating a large, hollow cavity. Using 100% water often results in the most dramatic puff and the driest, crispiest shell, ideal for pastries meant to be filled and served quickly. For example, a standard recipe might use 240ml (about 1 cup) of water for 150g of flour, alongside butter and eggs.
Milk, on the other hand, adds richness, tenderness, and a slightly softer, more golden crust due to the presence of fats and sugars. A pâte à choux made with milk might not puff quite as dramatically as one made with water, but it offers a richer flavor profile. A common approach is to use a 50/50 mix of water and milk to balance crispness and richness.
The amount of liquid relative to flour is crucial; too little liquid results in a stiff dough that won't expand properly, while too much leads to a loose dough that spreads and doesn't hold its shape, preventing the achievement of the perfect pâte à choux texture. The liquid must be brought to a rolling boil with the butter before adding the flour.
Butter's Impact on Richness and Structure
Butter contributes fat, flavor, and tenderness to the pâte à choux. When combined with the liquid and flour, the fat coats the flour particles, inhibiting excessive gluten development, which helps create a tender interior. More importantly, the butter melts and its water content (typically around 16-18% in European-style butter, slightly less in American) converts to steam during baking, contributing to the leavening process alongside the steam from the main liquid. The fat also helps create a more tender crumb within the shell itself. Using unsalted butter is generally recommended, as it allows you to control the salt content precisely.
The amount of butter used is balanced against the liquid and flour. Too little butter can result in a tougher pastry, while too much can make the dough greasy and prone to spreading rather than puffing upwards. For instance, a recipe might call for 100-120g of butter per 240ml of liquid and 150g of flour. High-quality butter with good flavor will also enhance the overall taste of the finished pastry. The butter must be fully melted with the liquid before the flour is added to ensure even distribution throughout the mixture.
Eggs: The Binder and Leavening Agent
Eggs are arguably the most critical ingredient for achieving the perfect pâte à choux texture. They serve multiple functions: binding the cooked flour-liquid mixture into a cohesive paste, providing structure through their proteins, adding richness and color from the yolks, and contributing significant moisture (about 75% water) which converts to steam during baking, acting as a primary leavening agent.
The amount of egg added is not fixed but depends on the consistency of the panade; it's typically added gradually until the dough reaches the correct texture – often described as pulling back into a 'V' or 'ribbon' when lifted with a spoon. This usually requires 3 to 5 large eggs for the quantities mentioned previously (240ml liquid, 150g flour, 100-120g butter), totaling roughly 150-250g of egg.
Adding too few eggs results in a stiff dough that won't puff adequately, yielding small, dense pastries. Adding too many eggs makes the dough too loose, causing it to spread excessively during baking and potentially collapse, resulting in flat, sad choux. The temperature of the eggs can also play a role; using room-temperature eggs helps them incorporate more smoothly into the warm dough.
It's best practice to lightly whisk the eggs before adding them in stages, allowing you to gauge the dough's consistency accurately and stop adding when the target texture is reached. This careful emulsification of the eggs into the cooked base is fundamental to developing the structure needed for the characteristic hollow interior.
The Step-by-Step Guide to Achieving Perfect Pâte à Choux Texture
Step 1: The Panade: Cooking the Base Correctly
The first crucial step in achieving the perfect pâte à choux texture is properly cooking the panade. This involves bringing the liquid (water, milk, or both) and butter to a rolling boil, then adding all the flour at once. Immediately stir vigorously with a wooden spoon or sturdy spatula over medium heat. The goal is to cook the flour and gelatinize its starches, forming a thick, smooth paste that pulls away from the sides and bottom of the pan.
This process typically takes 1 to 3 minutes after adding the flour. You should see a slight film or crust forming on the bottom of the pan, indicating that enough moisture has evaporated. This evaporation is vital because it creates space within the dough structure for steam to expand later.
Under-cooking the panade leaves too much moisture in the dough, resulting in less steam leavening and a potentially dense or soggy interior. Over-cooking can dry out the paste excessively, making it difficult to incorporate the eggs smoothly and potentially leading to a tougher texture.
A properly cooked panade will look cohesive and smooth, not lumpy or grainy, and will easily form a ball that doesn't stick excessively to the pan. For example, starting with 250ml water and 100g butter, add 150g flour and cook until the dough forms a ball and a light film appears, which might take around 90 seconds of vigorous stirring.
Step 2: Incorporating Eggs: Achieving the Right Consistency (Pâte)
Once the panade is cooked, it's transferred to a mixing bowl (or kept in the pan off the heat) and allowed to cool slightly for a few minutes. This prevents the hot paste from scrambling the eggs. The eggs are then added gradually, one at a time, mixing thoroughly after each addition until fully incorporated.
This can be done by hand with a wooden spoon (requiring significant effort) or using a stand mixer with a paddle attachment on medium speed. The dough will initially look separated and slippery with each egg addition, but it will come back together into a smooth, glossy paste. The key is to add just enough egg to reach the correct consistency.
The ideal consistency is often described as a 'ribbon' or 'lava' consistency. When you lift a spoon or the paddle attachment, the dough should fall back into the bowl in a thick, glossy ribbon that holds its shape for a moment before slowly blending back into the mass. Another test is to dip a finger in the dough and pull it away; a 'V' shape should form as the dough stretches.
This consistency provides the perfect balance of structure and fluidity needed for piping and ensures the dough has enough moisture from the eggs to generate significant steam during baking. Adding eggs incrementally, perhaps half an egg at a time towards the end, allows for fine-tuning, as the exact number of eggs needed can vary slightly based on the size of the eggs and how much moisture evaporated during the panade stage.
Step 3: Piping: Shaping for Even Baking
Proper piping technique is essential for achieving uniform size and shape, which in turn ensures even baking and contributes to the perfect pâte à choux texture. The dough, now a smooth, glossy paste, is typically transferred to a piping bag fitted with a plain or star tip. Piping uniform shapes, whether rounds for profiteroles (often 3-4 cm in diameter) or elongated fingers for éclairs (typically 10-12 cm long), allows them to bake at the same rate. Inconsistent sizes will result in some pastries being overbaked and dry while others are underbaked and potentially collapsing.
Before baking, the piped shapes are often lightly brushed with an egg wash. This gives them a beautiful golden color and helps create a slightly crispier crust. For a smoother finish, you can gently smooth any peaks left by the piping tip with a wet finger or the back of a spoon.
Ensuring adequate space between pastries on the baking sheet (at least 2-3 cm apart) is crucial. As they bake, they expand significantly (often doubling or tripling in volume), and if they touch, their sides can become soft and prevent proper crust formation. Piping onto parchment paper or a silicone mat placed on a sturdy baking sheet ensures easy release and even heat distribution.
Step 4: Baking: Controlling Expansion and Drying
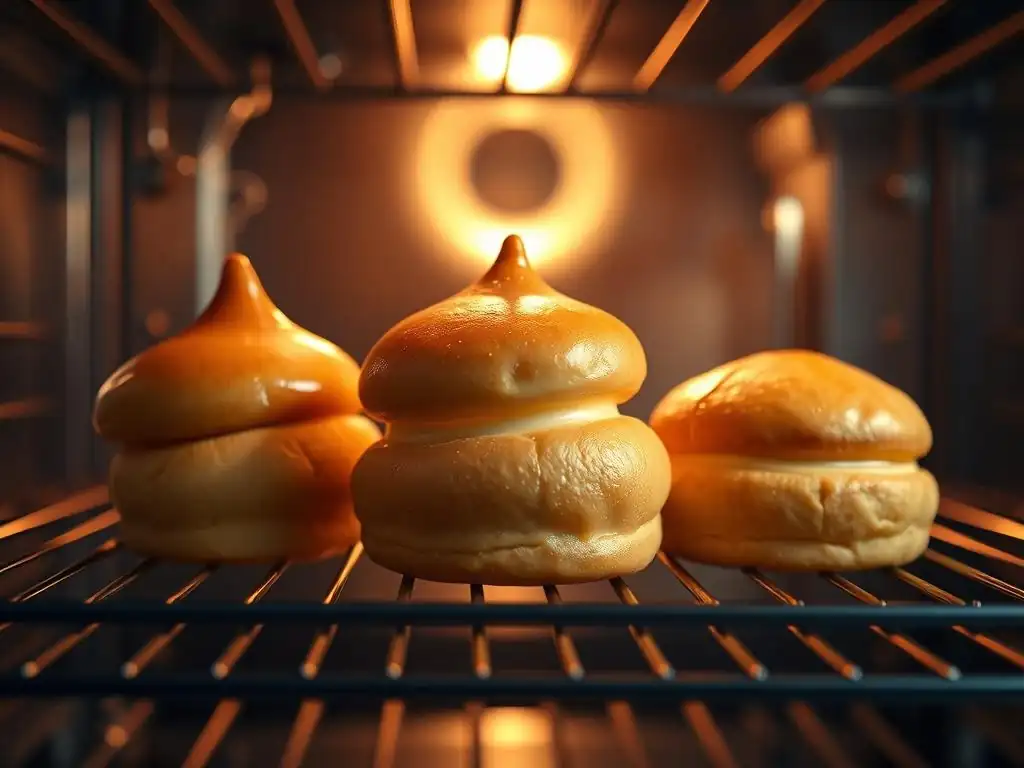
Baking is where the magic of pâte à choux happens, and precise temperature control is vital for achieving the perfect pâte à choux texture. Choux pastry is typically baked using a two-stage temperature approach. It starts at a high temperature, often around 200-220°C (400-425°F), for the first 10-15 minutes. This initial blast of high heat creates a sudden burst of steam from the moisture in the dough, causing rapid expansion and forming the hollow interior. The high temperature also helps set the structure quickly.
After this initial puff, the temperature is typically reduced to a lower setting, around 170-180°C (325-350°F), for the remaining baking time (another 15-30 minutes, depending on size). This lower temperature allows the pastry to dry out and develop a firm, crisp shell without burning. It's absolutely crucial not to open the oven door during the initial high-heat phase, as this can cause the pastries to deflate.
Once the temperature is reduced and the pastries are golden brown and look set, you might briefly crack the oven door open (using a wooden spoon) for the last 5-10 minutes to help them dry out further. Baking time varies significantly with size; small profiteroles might take 20-25 minutes total, while large éclairs could take 35-45 minutes. They should be deep golden brown and feel light and hollow when lifted.
Step 5: Cooling: Preventing Collapse
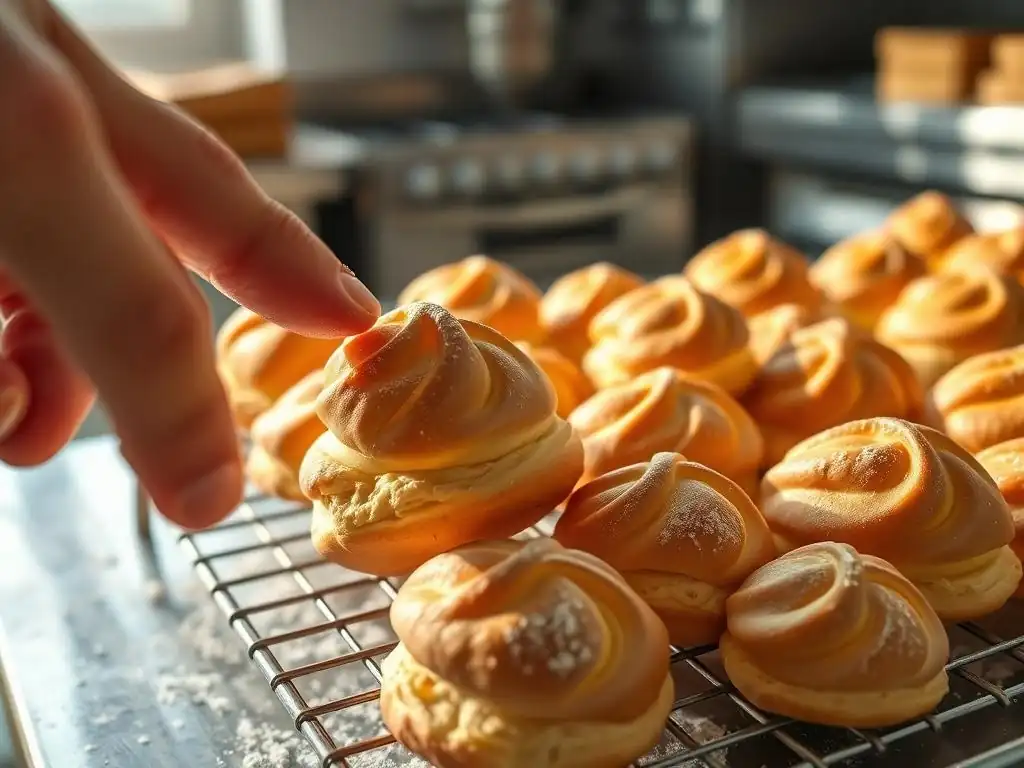
Proper cooling is the final, often underestimated, step in ensuring the perfect pâte à choux texture is maintained. Once baked to a deep golden brown and feeling light, the pastries should be removed from the oven. The crucial point here is to allow the steam trapped inside to escape gradually. If they cool too quickly or in a humid environment, the sudden temperature change can cause the steam to condense rapidly, leading to a soggy interior and potentially causing the pastry to collapse.
A common technique is to pierce the bottom or side of each pastry with a sharp knife or skewer immediately upon removal from the oven. This allows the steam to vent quickly. Alternatively, some bakers simply turn off the oven, prop the door open slightly, and let the pastries cool inside the gradually cooling oven for 10-15 minutes. This slow cooling process helps the shell maintain its crispness as the interior dries out slightly more.
Once vented, they should be transferred to a wire rack to cool completely, ensuring air circulation around all sides. Avoid placing them directly on a solid surface, which traps moisture and can make the bottom soggy. Properly cooled choux should be firm, crisp, and completely hollow inside.
Troubleshooting Common Pâte à Choux Problems
Flat Pastries: Solutions and Prevention
Flat pâte à choux is one of the most disheartening problems a baker can face, completely preventing the achievement of the perfect pâte à choux texture. This issue often stems from insufficient steam leavening or a weak dough structure. Common causes include under-cooking the panade, which leaves too much moisture and prevents proper starch gelatinization needed for structure. Another frequent culprit is adding too many eggs, which makes the dough too loose and unable to hold its shape or trap steam effectively. Baking at too low an initial temperature will also prevent the rapid steam burst needed for expansion.
To prevent flat pastries, ensure your panade is cooked long enough until a film forms on the bottom of the pan (typically 1-3 minutes after adding flour). Be meticulous when adding eggs; add them gradually and stop as soon as the dough reaches the correct 'ribbon' consistency. Use a reliable oven thermometer to confirm your oven reaches the specified high initial temperature (around 200-220°C or 400-425°F). If your pastries come out flat despite following these steps, consider reducing the amount of liquid or increasing the flour slightly in your recipe, or add slightly less egg the next time.
Soggy Interior: How to Improve Baking
A soggy or wet interior, even if the outside looks golden, indicates that the pastry did not dry out sufficiently during baking, failing to achieve the desired perfect pâte à choux texture. This often happens if the pastries are removed from the oven too soon, before the interior has fully dried and the shell has become firm.
It can also result from baking at too high a temperature for the entire duration, which browns the outside quickly before the inside has time to cook through and dry, or from not reducing the oven temperature after the initial puff. High humidity on the baking day can also contribute to this problem.
To remedy a soggy interior, ensure you are using the two-stage baking method (high heat first, then lower heat). Bake until the pastries are a deep golden brown, not just light gold. They should feel very light when lifted, indicating the moisture has evaporated. Extend the baking time at the lower temperature if needed.
For example, if your recipe calls for 20 minutes at 180°C, try baking for 25-30 minutes. You can also try cracking the oven door open slightly for the last 5-10 minutes of baking to allow moisture to escape. Piercing the hot pastries immediately upon removal from the oven also helps vent steam and promotes a drier interior.
Uneven Puff: Achieving a Consistent Structure
Uneven puff, where some pastries puff beautifully while others remain smaller or irregular in shape, detracts from the visual appeal and indicates inconsistency in achieving the perfect pâte à choux texture across the batch. This issue is frequently caused by variations in piping size and shape – smaller or thinner sections will cook and set faster than larger, thicker ones.
Uneven oven temperature can also play a significant role; hot spots in the oven cause some pastries to bake faster and more intensely than others. Placing pastries too close together on the baking sheet restricts airflow and can lead to uneven heating and puffing.
To achieve a consistent puff, focus on piping uniform shapes and sizes. Using a template drawn on the underside of the parchment paper can help guide your piping. Ensure there is adequate space (at least 2-3 cm) between each pastry on the baking sheet to allow for even heat circulation.
If you suspect your oven has hot spots, rotate the baking sheet halfway through the baking time. Using a reliable oven thermometer can help identify if your oven temperature is fluctuating or inaccurate. Consistency in dough consistency from the egg incorporation stage is also key; a perfectly emulsified dough will pipe more uniformly.
Baking Techniques for Optimal Sourdough Crumb
Correction: The heading should refer to Pâte à Choux texture, not Sourdough Crumb. I will proceed with the intended topic.
Baking Techniques for Optimal Pâte à Choux Texture
Oven Temperature: The Crucial Factor for Expansion
As highlighted earlier, oven temperature is arguably the single most critical factor in achieving the perfect pâte à choux texture. The rapid transformation of water into steam is the primary leavening mechanism, and this requires intense heat. Starting the bake at a high temperature, typically between 200°C and 220°C (400°F and 425°F), is essential. This high heat causes the moisture within the dough to flash into steam almost instantly, forcing the dough to expand dramatically and creating that characteristic hollow cavity. This initial phase, lasting about 10-15 minutes, sets the outer shell's structure.
Following the initial high-heat phase, reducing the oven temperature to a moderate range, usually 170°C to 180°C (325°F to 350°F), is equally important. This lower temperature allows the pastry to continue baking and, crucially, to dry out thoroughly without burning the exterior. If the temperature remains too high, the outside will brown and crisp too quickly while the inside remains moist and potentially collapses upon cooling.
Baking time at this lower temperature varies based on the size of the choux, but it's often as long or longer than the initial high-heat phase. Using an internal oven thermometer is highly recommended to ensure your oven is reaching and maintaining the correct temperatures, as oven thermostats can be inaccurate by as much as 20-30°C.
Steam: Creating a Crisp Exterior
While the steam within the dough is responsible for the puff, introducing additional steam into the oven environment during the initial high-heat phase can also benefit the perfect pâte à choux texture. External steam keeps the surface of the dough moist and elastic for a few critical minutes, allowing it to expand more freely and achieve maximum volume before the crust sets.
This can lead to a larger puff and a more even, less cracked surface. Once the crust sets, the external steam is no longer necessary and can even be detrimental if it prevents the shell from drying out.
There are several ways to introduce steam:
- Placing a pan of hot water on the bottom rack of the oven when preheating.
- Spraying the oven walls with water just before closing the door after putting the choux in (be cautious not to spray the light or heating elements).
- Using a baking stone or steel that has been preheated, then carefully pouring a small amount of water into a tray beneath it to create steam.
While not strictly necessary for a good result, especially with smaller choux like profiteroles, adding steam can help achieve a slightly better rise and a smoother, more consistent crust, contributing to the overall goal of perfect pâte à choux texture. For larger pastries like Paris-Brest rings, steam can be particularly helpful in achieving maximum, even expansion.
The Importance of Opening the Oven Door (or not)
Knowing when not to open the oven door is as important as knowing the right temperatures for achieving the perfect pâte à choux texture. The most critical period is the initial high-heat phase when the pastries are rapidly expanding due to steam. Opening the oven door during this time causes a sudden drop in temperature, which can shock the delicate, expanding structure. This often leads to the pastries deflating or collapsing, resulting in a flat or dense interior. It's best to resist the urge to peek for at least the first 10-15 minutes of baking.
Once the pastries have fully puffed and the temperature has been reduced, opening the door briefly towards the end of the baking time can actually be beneficial. As mentioned earlier, propping the door open slightly for the last 5-10 minutes allows humid air to escape, helping the shells to dry out more completely and become crispier. This final drying step is crucial for preventing the dreaded soggy bottom or chewy texture. So, keep the door firmly shut during the puffing stage, but consider opening it slightly during the final drying stage for optimal results.
Cooling Techniques: Ensuring Structure
Correction: The heading should refer to Pâte à Choux, not Sourdough. This section was already covered under "Step 5: Cooling: Preventing Collapse". I will provide alternative content related to baking techniques for structure.
Using a Baking Stone or Steel
Utilizing a preheated baking stone or steel can significantly enhance the baking process for pâte à choux and contribute to the perfect pâte à choux texture. Stone or steel surfaces absorb and retain heat very efficiently. When the baking sheet containing the piped choux is placed directly onto a hot stone or steel, it provides a strong, even burst of heat to the bottom of the pastries. This intense bottom heat is crucial for rapid steam generation and ensures a powerful initial lift.
The consistent and high heat transfer from the stone or steel helps the base of the choux set quickly and puff upwards rather than spreading outwards. This leads to a more defined shape and a larger, more reliable hollow cavity. Preheat the stone or steel in the oven at the highest temperature for at least 30-60 minutes before placing the baking sheet on it.
While not strictly necessary, using a stone or steel can help mitigate issues with uneven oven heating and provide a more consistent result, particularly beneficial for achieving repeatable perfect pâte à choux texture. Ensure your baking sheet is flat and sturdy enough to sit evenly on the stone or steel.
Mastering Sourdough: Beyond the Basics
Correction: The heading should refer to Pâte à Choux, not Sourdough. I will proceed with the intended topic.
Mastering Pâte à Choux: Beyond the Basics
Liquid Variations: Exploring Different Results
Beyond the standard water or milk base, experimenting with different liquids can subtly alter the flavor and texture of your pâte à choux. Using a richer liquid like half-and-half or even heavy cream instead of milk will result in a significantly richer dough and a more tender, less crisp shell. This can be desirable for certain applications, like savory gougères where a very crisp shell isn't the primary goal. For example, replacing the milk/water with chicken stock can make a flavorful base for savory choux filled with chicken or mushroom mixtures.
Fruit purées or vegetable juices could theoretically be used, although the sugar content in some might affect browning, and the consistency would need careful adjustment. A common variation is using beer or wine in savory gougères, which adds depth of flavor but requires simmering to reduce the alcohol and concentrate the flavor before adding the butter and flour.
Each liquid variation will interact differently with the flour and eggs, influencing the final dough consistency and requiring slight adjustments in the amount of liquid or eggs added to achieve the desired texture before piping. Exploring these variations allows you to tailor the basic pâte à choux recipe to specific culinary needs and expand your repertoire beyond the classic perfect pâte à choux texture.
Sugar/Salt Variations: Understanding Their Impact
While most classic pâte à choux recipes contain only minimal sugar (sometimes none) and salt, adjusting these can subtly impact the outcome. A pinch of salt is typically included (around 1/4 teaspoon per 150g flour) to enhance flavor, but it also slightly tightens the gluten structure. Increasing the salt significantly could potentially make the dough tougher. Sugar, while not traditionally a main ingredient in the base dough (it's more common in fillings or toppings), can be added in small amounts (e.g., 1-2 teaspoons) to promote browning of the crust and add a touch of sweetness.
However, adding too much sugar (more than 1-2 tablespoons per standard batch) can interfere with gluten development and starch gelatinization, potentially leading to a weaker structure and less puff. Sugar also caramelizes at high temperatures, so a sugary dough will brown much faster, risking a burnt exterior before the interior is cooked through.
Savory applications like gougères typically omit sugar entirely and might increase the salt slightly (e.g., 1/2 teaspoon or more, especially if cheese is being added). Understanding these minor ingredient variations helps fine-tune the basic formula to achieve specific flavor profiles while still maintaining the structural integrity needed for the perfect pâte à choux texture.
Advanced Techniques: Craquelin for Enhanced Structure
Adding a craquelin topping is an advanced technique that significantly enhances both the appearance and texture of pâte à choux, taking the perfect pâte à choux texture to a new level. Craquelin is a simple mixture of butter, sugar (often brown sugar), and flour, mixed into a dough, rolled thin, and cut into discs or squares. These pieces are placed on top of the piped choux dough just before baking. As the choux bakes and expands, the craquelin cracks and spreads over the surface, creating a beautiful, textured crust.
Beyond aesthetics, craquelin provides structural support during the initial puffing phase, helping the choux expand more evenly and preventing cracks in the shell that are not desired (unlike the controlled cracks from scoring). It also creates a wonderfully crisp layer that adds a delightful contrast to the tender interior and the filling. The sugar in the craquelin also contributes to a beautiful, even golden-brown color.
For example, a typical craquelin recipe might use equal parts butter, sugar, and flour (e.g., 50g each), rolled to about 2mm thickness and chilled before cutting and placing on 4-5 cm piped choux rounds. This simple addition elevates standard choux pastry into something truly special.
Sourdough Recipe: The Sourdough School's Foolproof Formula for Perfect Crumb
Correction: The heading should refer to Pâte à Choux, not Sourdough. I will provide a recipe for Pâte à Choux.
Pâte à Choux Recipe: A Foolproof Formula for Perfect Texture
Ingredients List for Achieving the Ideal Consistency
This recipe provides a reliable base for achieving the perfect pâte à choux texture. It yields approximately 12-15 medium-sized profiteroles or 8-10 éclairs.
- 125 ml (½ cup) Water
- 125 ml (½ cup) Whole Milk
- 100 g (7 tbsp) Unsalted Butter, cut into pieces
- ½ tsp Salt
- ½ tsp Granulated Sugar (optional, for slight sweetness and browning)
- 150 g (about 1 ¼ cups) All-Purpose Flour, sifted
- 4 to 5 large Eggs (approx. 200-250g total), lightly whisked, at room temperature
Note on eggs: The exact amount will depend on the consistency of the dough after adding the initial 4 eggs. Always have a fifth egg ready and add it gradually if needed to reach the correct 'ribbon' consistency. Using a kitchen scale for flour and eggs is highly recommended for accuracy.
Detailed Instructions for Achieving the Ideal Result
- Preheat your oven to 220°C (425°F). If using, place a pan for steam on the bottom rack. Line a baking sheet with parchment paper or a silicone mat.
- In a medium, heavy-bottomed saucepan, combine the water, milk, butter, salt, and sugar (if using). Heat over medium heat, stirring occasionally, until the butter is completely melted and the liquid comes to a rolling boil.
- Remove the pan from the heat. Add all the sifted flour at once. Stir vigorously with a wooden spoon or sturdy spatula until the mixture comes together into a smooth ball and pulls away cleanly from the sides of the pan.
- Return the pan to medium heat and continue stirring and cooking the dough for 1 to 2 minutes. This helps dry out the panade and gelatinize the starches. You should see a thin film form on the bottom of the pan.
- Transfer the dough to a stand mixer bowl fitted with the paddle attachment, or use a large mixing bowl if mixing by hand. Let it cool for 5 minutes, stirring occasionally, until it's still warm but not steaming hot (around 60°C or 140°F).
- With the mixer on medium-low speed (or mixing vigorously by hand), begin adding the whisked eggs gradually, a little at a time. Wait until each addition is fully incorporated and the dough comes back together before adding more.
- After adding the fourth egg, check the consistency. The dough should be smooth, glossy, and fall from the paddle (or spoon) in a thick ribbon or 'V' shape that holds its form briefly before melting back into the mass. If it's too stiff, gradually add small amounts of the fifth egg, mixing thoroughly after each addition, until the desired consistency is reached. You may not need all of the fifth egg.
- Transfer the dough to a piping bag fitted with your desired tip (e.g., a 1.5 cm plain tip for profiteroles or a star tip for éclairs). Pipe shapes onto the prepared baking sheet, leaving at least 3 cm (about 1.5 inches) of space between them.
- For a smooth finish, gently smooth any peaks with a damp finger or the back of a spoon. You can also lightly brush the tops with egg wash for extra color, avoiding drips onto the baking sheet.
- Place the baking sheet in the preheated oven. If adding steam, pour about ½ cup of hot water into the steam pan on the bottom rack and quickly close the oven door.
- Bake at 220°C (425°F) for 10-15 minutes, or until the pastries have puffed significantly and are starting to turn golden. Do not open the oven door during this time.
- Reduce the oven temperature to 180°C (350°F) and continue baking for another 15-30 minutes (depending on size), or until the pastries are deep golden brown, feel very light when lifted, and sound hollow when tapped on the bottom.
- Once baked, immediately pierce the bottom or side of each pastry with a sharp knife or skewer to allow steam to escape.
- Transfer the pastries to a wire rack to cool completely before filling. This ensures they remain crisp and maintain their structure, resulting in the desired perfect pâte à choux texture.
Conclusion: Unlock the Secrets to Perfect Sourdough Crumb with The Sourdough School
Correction: The heading should refer to Pâte à Choux texture, not Sourdough Crumb. I will conclude regarding Pâte à Choux.
Conclusion: Unlock the Secrets to Perfect Pâte à Choux Texture
Mastering pâte à choux is a rewarding journey in the world of baking, and achieving the perfect pâte à choux texture is the key to creating classic pastries that are light, airy, and ready to be filled with your favorite sweet or savory delights. We've explored how each ingredient plays a vital role, from the structural foundation provided by the flour and butter to the essential leavening power of the eggs and liquid.
The process, while seemingly simple, requires attention to detail at every stage, from properly cooking the panade to meticulously incorporating the eggs and controlling the crucial baking temperatures.
Troubleshooting common issues like flatness or sogginess allows you to learn from mistakes and refine your technique. By understanding the 'why' behind each step – why the panade needs to be cooked, why eggs must be added gradually, why oven temperature is so important – you gain the confidence to consistently produce beautiful choux pastries. Practice truly makes perfect with pâte à choux; each batch offers an opportunity to improve your feel for the dough's consistency and your understanding of how your oven behaves.
Armed with this knowledge and a reliable recipe, you are well on your way to unlocking the secrets of perfect pâte à choux texture, ready to fill your creations and impress yourself and others with delightful homemade éclairs, profiteroles, and more. Happy baking!
Frequently Asked Questions
What exactly is pâte à choux and why is its texture so important?
Pâte à choux is a light French pastry dough used to make profiteroles, éclairs, and cream puffs. The perfect texture, achieved through proper technique, is crucial for its signature rise and hollow interior.
What are the key ingredients in pâte à choux and how do they contribute to its texture?
The main ingredients are water, butter, flour, and eggs. Butter and water create steam for leavening, while flour provides structure. Eggs add richness, moisture, and further contribute to the rise.
What are some common mistakes that lead to a poor pâte à choux texture?
Common mistakes include insufficient cooking of the flour mixture, adding eggs too quickly, and using the wrong type of flour. This results in a flat, dense, or greasy final product.
How do I know when my pâte à choux dough is the right consistency?
The dough should be smooth, glossy, and form a soft peak when lifted with a spoon. It should also slowly fall off the spoon, retaining some of its shape.
How can I troubleshoot pâte à choux that didn't rise properly?
Ensure the oven temperature is correct and avoid opening the oven door during baking. The dough might have been too dry, indicating that more egg was needed, or not cooked enough on the stovetop.
Final Reflection: The Enduring Allure of Perfect Pâte à Choux
The pursuit of the perfect pâte à choux isn't merely about achieving a flawless texture; it's about mastering a fundamental technique that unlocks a world of culinary creativity. From delicate cream puffs to majestic éclairs, the possibilities are as endless as the variations in flavor and filling. This quest for textural perfection, therefore, remains incredibly relevant in today's food landscape, where precision and artistry are highly valued.
The journey to understanding pâte à choux, for me, has been a lesson in patience, precision, and the surprising power of seemingly simple ingredients. It's a testament to the enduring appeal of classic techniques, a reminder that sometimes the most satisfying results come from mastering the fundamentals. The most beautiful things are the simplest,
a sentiment that rings especially true when considering the elegant simplicity of a perfectly executed cream puff. The subtle nuances in texture – the crisp exterior yielding to a light, airy interior – are a testament to the baker's skill and dedication.
Now, I invite you to take what you've learned and embark on your own journey of pâte à choux perfection. Don't be discouraged by initial setbacks; embrace the process, experiment with different techniques, and savor the satisfaction of creating something truly beautiful and delicious. The path to mastery is paved with practice, and the reward – a perfectly textured cream puff, éclair, or profiterole – is well worth the effort. So, gather your ingredients, preheat your oven, and let the baking begin!
Unleash Your Inner Pâtissier: Master the Perfect Choux!
Thanks for joining us on this journey to choux pastry perfection! We hope you've gained valuable insights into achieving that flawlessly crisp exterior and light, airy interior. Now it's time to put your newfound knowledge into practice.
- Bake your dream choux: Try the recipe from the article, paying close attention to the temperature and mixing techniques. Don't be afraid to experiment – even slight variations can lead to delicious discoveries!
- Share your creations: Show off your choux masterpieces on social media using #BakeWithEaseChoux – we'd love to see your results!
- Explore other choux-based delights: Dive deeper into the world of choux pastry by researching different fillings and shapes. Think cream puffs, profiteroles, or even savory gougères!
What surprising flavor combination will you try in your next choux pastry adventure?