
From Dough to Delight: The Journey of a Croissant


Welcome to BakeWithEase, your haven for transforming simple ingredients into delectable creations! Ever dreamt of achieving bakery-worthy croissants in your own kitchen? Dive into our latest article and discover the secrets to perfecting a flaky croissant recipe easily. Unlock the art of laminated dough and embark on a delicious journey that will leave you craving more. What makes a perfect croissant? Let's find out!
- BakeWithEase Presents: Mastering the Art of Croissant Baking
- Understanding the Essence of a Flaky Croissant
- The Step-by-Step Guide to Baking Delicious Croissants at Home
- Tips and Tricks for Perfecting Your Flaky Croissant Recipe
- Enjoy Your Homemade Croissants: Serving Suggestions and Storage
-
Frequently Asked Questions
- How difficult is it to perfect a flaky croissant recipe using BakeWithEase?
- What key techniques does BakeWithEase emphasize for achieving flaky layers in croissants?
- Does BakeWithEase offer recipes suitable for beginner bakers who want to try croissants?
- What kind of ingredients can I expect to need for a croissant recipe from BakeWithEase?
- How long does it typically take to make croissants from start to finish using a BakeWithEase recipe?
- Final Reflection: The Enduring Allure of the Perfect Croissant
- Unlock Your Inner Boulanger: Bake Your Own Croissants!
BakeWithEase Presents: Mastering the Art of Croissant Baking
Welcome to the delightful world of croissants! There's something undeniably magical about a perfectly baked croissant – its shatteringly crisp exterior giving way to a tender, airy interior filled with countless buttery layers. While often seen as the pinnacle of home baking challenges, perfecting flaky croissant recipe easily is absolutely achievable with patience, the right techniques, and a little guidance. This journey from simple dough to a golden crescent of delight is incredibly rewarding, offering a taste of Parisian patisserie right in your own kitchen.
Embarking on this baking adventure requires understanding each stage, from the initial dough mixing to the final golden bake. We'll break down the process into manageable steps, demystifying terms like détrempe and lamination. By focusing on precision and technique, you'll gain the confidence needed to create croissants that impress. Get ready to transform basic ingredients into a truly exceptional pastry, proving that perfecting flaky croissant recipe easily is within your reach.
Understanding the Essence of a Flaky Croissant
What Makes a Croissant Truly Exceptional?
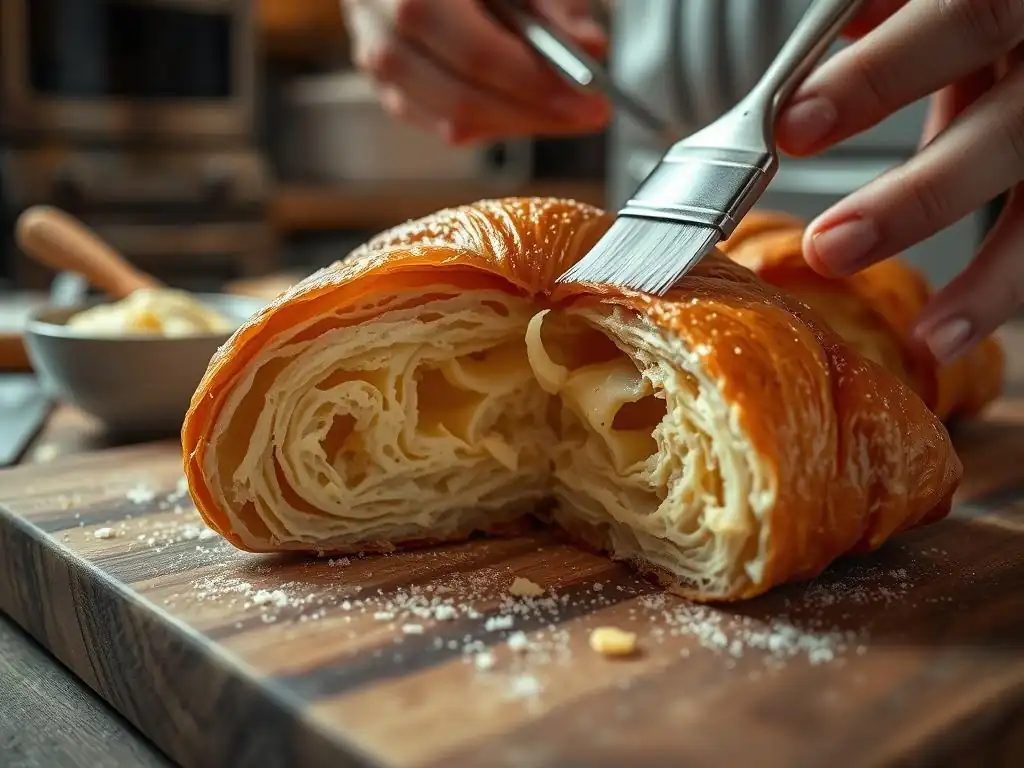
A truly exceptional croissant is a symphony of texture and flavor. It begins with that signature crisp crackle upon the first bite, a result of the numerous thin, caramelized layers of dough and butter. This exterior gives way to an interior that is light, airy, and almost custard-like, with large, open cells (known as the alveoli) indicating a successful proof and bake. The rich, slightly nutty flavor of butter is paramount, permeating every layer without feeling greasy.
Beyond texture and taste, the visual appeal is key. A well-made croissant has a beautiful golden-brown hue, often slightly darker on the tips, and a gracefully curved crescent shape. The layers should be visible and distinct, promising the flakiness within. Achieving this balance requires careful attention to temperature, timing, and technique throughout the entire process of perfecting flaky croissant recipe easily. It's not just about following steps, but understanding the science behind the magic.
The Key Ingredients for a Perfect Croissant Recipe
The foundation of a perfect croissant lies in a few simple, high-quality ingredients: flour, water, yeast, sugar, salt, milk, and, most crucially, butter. The type of flour matters; a strong bread flour (around 11-13% protein) provides the necessary gluten structure to handle the extensive rolling and folding, while a blend with all-purpose flour can sometimes offer a slightly more tender crumb. The hydration level of the dough needs to be precise, typically ranging from 50-60% of the flour weight, to create a dough that is pliable yet firm enough for lamination.
Butter is the star of the show, responsible for the layers and much of the flavor. Using high-quality, high-fat butter (ideally 82% butterfat or higher) is essential. European-style butters often fit this bill. The butter needs to be pliable but cold for lamination, about 10-13°C (50-55°F).
Too cold and it breaks, too warm and it melts into the dough, preventing distinct layers. Sugar provides food for the yeast and aids in browning, while salt balances the flavors and controls yeast activity. Milk adds richness and helps tenderize the crumb. Mastering the interaction of these ingredients is vital for perfecting flaky croissant recipe easily.
The Step-by-Step Guide to Baking Delicious Croissants at Home
Step 1: Preparing the Détrempe (The Dough Base)
Mixing the Initial Ingredients for Optimal Dough Texture
The détrempe, or the base dough, is where our croissant journey begins. Combine your dry ingredients – flour, sugar, salt, and instant yeast (or activated active dry yeast) – in a large bowl. Whisk them together to ensure even distribution. In a separate bowl, whisk together the wet ingredients: cold water and cold milk.
The liquids must be cold, typically around 4-5°C (39-41°F), to keep the dough temperature low, which is critical for the subsequent lamination process. Add the wet ingredients to the dry and mix using a stand mixer with a dough hook on low speed, or by hand, until just combined and no dry pockets of flour remain. Avoid overmixing at this stage; we're not looking for full gluten development yet.
The goal here is to form a shaggy, slightly sticky dough mass. Once the ingredients are roughly incorporated, you can add a small amount of softened butter (often around 10-15% of the flour weight) to the dough. This initial butter addition improves the dough's texture, making it more extensible and easier to handle during lamination. Mix until the butter is just incorporated. The dough will still look rough, but it's ready for the next step towards perfecting flaky croissant recipe easily.
Kneading the Détrempe to Develop Gluten Strength
After the initial mix, the détrempe needs gentle kneading to start developing the gluten network. Transfer the shaggy dough to a lightly floured surface or continue in the stand mixer on low-medium speed for about 5-8 minutes. The dough should become smoother and more cohesive, pulling away from the sides of the bowl (if using a mixer). You're looking for medium gluten development – the dough should be somewhat elastic but still tear when stretched thinly. An overdeveloped dough can be too springy and difficult to roll out during lamination.
A good test is the windowpane test, though the dough doesn't need to pass it perfectly at this stage. Pinch off a small piece of dough and gently stretch it. If you can stretch it thin enough to see light through it before it tears, you've achieved sufficient gluten development. If it tears immediately, knead for another minute or two. This controlled kneading ensures the dough has the strength needed to support the layers of butter and withstand the rolling process, which is crucial for perfecting flaky croissant recipe easily.
Chilling the Détrempe: The Importance of Resting the Dough
Chilling the détrempe is a non-negotiable step. After kneading, shape the dough into a rectangle or square about 2-3 cm (1 inch) thick. This pre-shaping makes it easier to incorporate the butter block later. Wrap the dough tightly in plastic wrap, ensuring no air pockets, and place it in the refrigerator for a minimum of 2-4 hours, but preferably overnight (12-18 hours). The ideal temperature for chilling is around 4°C (39°F).
This cold rest serves multiple critical purposes. Firstly, it significantly slows down yeast activity, preventing premature proofing. Secondly, and most importantly for perfecting flaky croissant recipe easily, it relaxes the gluten structure developed during kneading. This relaxation makes the dough much easier to roll out thinly and evenly during the lamination process without it springing back excessively. A properly chilled and rested détrempe is pliable and ready to receive the butter block.
Step 2: Preparing the Butter Block (Beurrage)
Achieving the Right Butter Consistency for Lamination
The butter block, or beurrage, is just as important as the dough. The butter's consistency is paramount for successful lamination. It needs to be cold, but pliable – similar to the consistency of playdough or firm modeling clay. If it's too hard, it will break into pieces when rolled, tearing the dough. If it's too soft or warm, it will melt into the dough, destroying the layers. The ideal temperature range for the butter block is typically between 10-13°C (50-55°F).
To achieve this, take your cold butter (high-fat recommended) and cut it into slices. Arrange the slices close together on a piece of parchment paper. Cover with another piece of parchment and gently beat it with a rolling pin to soften and make it uniform. Then, roll it out between the parchment paper to the desired size and thickness for your recipe, usually a rectangle or square, about 6mm (1/4 inch) thick. Once rolled, chill the butter block until it reaches the correct pliable consistency – firm but not brittle.
Shaping the Butter Block for Even Distribution
The shape and size of the butter block are important for ensuring even distribution within the détrempe during lamination. The butter block is typically shaped into a rectangle or square that is slightly smaller than the rolled-out détrempe it will be encased in. For example, if you plan to roll your dough into a 20x40 cm rectangle, your butter block might be around 18x18 cm (if folded in half) or 18x38 cm (if covering most of the dough).
Precision in shaping the butter block, often into a neat rectangle, helps create uniform layers across the entire sheet of dough. This uniformity is key to achieving consistent flakiness in every part of the croissant. After shaping, ensure the butter is at the correct pliable yet cool temperature before proceeding. This careful preparation of the beurrage is a fundamental step towards perfecting flaky croissant recipe easily.
Step 3: Lamination: Creating the Signature Layers
The First Turn: Folding and Rolling the Dough
Lamination is the process of repeatedly folding and rolling the détrempe with the butter block enclosed, creating alternating layers of dough and butter. The first turn is critical for successfully incorporating the butter. Take your chilled, rested détrempe and roll it out on a lightly floured surface into a rectangle about twice the size of your butter block.
Place the pliable butter block onto one half of the dough rectangle, leaving a small border around the edges. Fold the other half of the dough over the butter block, sealing the edges to fully encase the butter. Ensure the seams are pressed together firmly to prevent butter leakage during rolling.
Now, gently but firmly roll the dough package into a long rectangle, typically about 6-8mm (1/4-1/3 inch) thick. Roll evenly, working from the center outwards, applying consistent pressure to maintain even thickness. Once rolled, perform the first fold. A common method is the "book fold" or "double fold": fold one end of the rectangle towards the center, and then fold the other end over it, as if closing a book.
Alternatively, a "single fold" involves folding one third up and the other third down, like folding a letter. Each fold creates multiple layers. After the first fold, wrap the dough tightly and chill for at least 30-60 minutes to relax the gluten and firm up the butter. This initial lamination sets the stage for perfecting flaky croissant recipe easily.
The Second Turn: Enhancing the Lamination Process
After the required resting period, take the dough out of the refrigerator. Place it on a lightly floured surface with the folded edge facing you (like the spine of a book). This orientation helps ensure even rolling and layering. Roll the dough out again into a long rectangle of similar dimensions (around 6-8mm thick) as before. Be mindful of keeping the edges straight and the thickness uniform. Uneven rolling leads to uneven layers.
Perform the second fold, using the same method (single or double) as the first turn. Each turn effectively multiplies the number of layers. For instance, a single fold creates 3 layers from the existing ones, while a double fold creates 4.
After the second fold, wrap the dough tightly again and return it to the refrigerator for another rest of at least 30-60 minutes. This rest is crucial to prevent the dough from becoming too elastic and difficult to work with, and to keep the butter from melting. Patience during these chilling periods is essential for perfecting flaky croissant recipe easily.
The Third Turn: Achieving Maximum Flakiness
Depending on the desired number of layers and the specific recipe you are following, a third turn is often performed. Some recipes call for three single folds, while others use a combination, like one double and one single, or two double folds. A typical croissant recipe aiming for maximum flakiness often involves three single folds or one double and one single fold, resulting in potentially dozens or even hundreds of layers by the end. For example, three single folds result in 3 * 3 * 3 = 27 theoretical layers, while a double followed by a single results in 4 * 3 = 12 layers (though the actual layer count is complex due to the nature of folding).
Just like the previous turns, after the second rest, orient the dough correctly, roll it out to the specified thickness (usually still 6-8mm), and perform the third fold. Roll carefully and evenly to maintain the integrity of the layers. This final turn builds upon the previous lamination, creating the multitude of thin dough and butter sheets that will expand in the oven to form the characteristic flaky structure.
After the third turn, the dough requires a final, longer rest in the refrigerator, usually 2-4 hours, or even overnight, before shaping. This final rest allows the gluten to fully relax and the butter to firm up completely, making the dough ready for shaping and perfecting flaky croissant recipe easily.
Resting the Dough Between Turns: Preventing Gluten Overdevelopment
The chilling periods between each turn are not merely pauses; they are vital steps in the lamination process. As mentioned, chilling the dough relaxes the gluten that is developed and tightened during rolling. Without adequate rest, the dough would become too elastic and resistant to rolling, making it shrink back and potentially tear, disrupting the precious layers. Each rest allows the gluten network to loosen up, making the dough pliable and easy to roll thinly for the next turn.
Furthermore, chilling keeps the butter solid and distinct from the dough. If the butter warms up and melts into the dough during rolling, the layers are lost, and you end up with a greasy, dense result rather than a flaky one. Maintaining a cold temperature for both the dough and the butter (ideally around 4-7°C / 39-45°F during resting) is paramount. Rushing the chilling process is one of the most common mistakes that prevents bakers from perfecting flaky croissant recipe easily.
Step 4: Shaping and Proofing Your Croissants

Cutting the Dough into Triangles: Precise Measurements for Uniformity
Once the laminated dough has had its final, long rest and is well-chilled, it's ready for shaping. Lightly flour your work surface and carefully roll out the dough into a large, thin rectangle, typically aiming for a thickness of about 3-4mm (1/8 inch). Roll as evenly as possible to ensure uniform thickness across the sheet. Trim the edges to create clean, straight sides, which helps when cutting.
Using a sharp knife or pizza cutter, cut the dough into long triangles. For classic-sized croissants, the base of the triangle is usually around 8-10 cm (3-4 inches), and the length (or height) is approximately 20-25 cm (8-10 inches). Precise measurements ensure that all your croissants are a similar size and shape, leading to uniform baking. Some recipes might specify different dimensions for mini or larger croissants. Mark the base measurements along the bottom edge of the rectangle first, then use a ruler to guide diagonal cuts from those marks to the opposite edge, forming the triangles.
Rolling the Croissants: Achieving the Classic Crescent Shape
With your triangles cut, it's time to roll them into the iconic croissant shape. Make a small notch or slit (about 1-2 cm / 0.5-1 inch long) in the center of the base of each triangle. This slit helps the base open up when rolling and allows for a more pronounced crescent shape. Starting from the notched base, gently stretch the triangle lengthwise as you roll it up towards the point. Rolling firmly but not too tightly will help create tension, which encourages the croissant to expand upwards during baking.
As you roll, guide the sides inwards slightly to form the classic shape. The tip of the triangle should end up on the bottom of the rolled croissant. Once rolled, gently curve the ends inwards to enhance the crescent shape. Place the shaped croissants seam-side down on a baking sheet lined with parchment paper, ensuring adequate space between them as they will expand significantly during proofing and baking. This careful rolling technique is key to perfecting flaky croissant recipe easily.
Proofing the Croissants: Creating Light and Airy Texture
Proofing is arguably the most critical stage for achieving a light, airy interior crumb with those desirable large holes (alveoli). After shaping, the croissants need to proof in a warm, humid environment until they are significantly increased in size and visibly puffy. The ideal proofing temperature is typically around 24-27°C (75-80°F).
Too cold, and they won't proof properly; too warm, and the butter will melt out before they bake. A proofing box is ideal, but you can create a suitable environment in a turned-off oven with a pan of hot water on the rack below, or by placing them in a warm room and covering them loosely with plastic wrap or a damp towel.
Proofing time varies greatly depending on the temperature and yeast activity, usually taking anywhere from 2 to 3 hours. The croissants are ready when they are significantly larger (almost doubled in size), feel very light and puffy, and jiggle slightly when the pan is gently shaken. You should be able to see the distinct layers becoming more prominent.
A gentle poke test can also help: if you gently press the side and the indentation slowly springs back halfway, they are perfectly proofed. Over-proofing can cause the layers to collapse, while under-proofing results in a dense crumb. Patience and observation are key to perfecting flaky croissant recipe easily at this stage.
Step 5: Baking Your Croissants to Golden Perfection
Preheating the Oven: The Ideal Baking Temperature
Baking croissants requires a high initial temperature to create that essential oven spring and set the layers quickly before the butter melts completely. Preheat your oven to a hot temperature, typically around 200-220°C (400-425°F). It's crucial that the oven is fully preheated to this temperature, and ideally, you should let it preheat for 20-30 minutes after it indicates it's ready to ensure the heat is stable and consistent throughout the oven cavity.
Some bakers like to use a baking stone or steel that has been preheating in the oven to provide a burst of heat from below, further enhancing oven spring and crispness. The specific temperature might vary slightly depending on your oven and recipe, but a hot oven is non-negotiable for achieving the desired lift and a beautifully golden-brown crust. Properly preheating the oven is a vital final step in perfecting flaky croissant recipe easily.
Baking Time: Monitoring for Golden Brown Color and Flakiness
Before baking, many recipes call for an egg wash (a mixture of beaten egg, sometimes with a little milk or water) brushed gently over the proofed croissants. This egg wash contributes to the beautiful golden-brown color and a slightly glossy finish. Be careful not to deflate the delicate proofed dough when applying the wash.
Place the baking sheet with the proofed, egg-washed croissants into the preheated oven. The initial high temperature helps the layers puff dramatically. After about 10-15 minutes, the croissants should be well-risen and starting to turn golden. At this point, some recipes recommend reducing the oven temperature slightly (e.g., to 180-190°C / 350-375°F) to allow the interior to finish baking through without the exterior burning.
The total baking time typically ranges from 15 to 25 minutes, depending on the size of the croissants and your oven. They are done when they are a deep golden-brown color all over, feel light, and sound hollow when tapped on the bottom. Don't be afraid to bake them until they are a rich golden hue; underbaked croissants are doughy and heavy. Achieving this perfect color and flakiness signifies you are mastering the art of perfecting flaky croissant recipe easily.
Cooling the Croissants: Preserving the Crispy Texture
Once baked to perfection, immediately transfer the croissants from the hot baking sheet to a wire rack to cool. Cooling on a rack allows air to circulate around the entire croissant, preventing steam from condensing on the bottom and making it soggy. This is crucial for preserving that desirable crispy, flaky exterior.
While it's tempting to dive in immediately, allow the croissants to cool for at least 15-20 minutes. This cooling period allows the internal structure to set properly. Enjoy them warm, but not piping hot, for the best texture and flavor experience. The aroma filling your kitchen is a testament to successfully perfecting flaky croissant recipe easily!
Tips and Tricks for Perfecting Your Flaky Croissant Recipe

Troubleshooting Common Croissant Baking Problems
Avoiding Butter Leakage During Baking
Butter leakage, or "butter blow-out," is a common and frustrating issue. It typically happens when the butter melts too quickly and escapes the dough layers before the structure is set. This can be caused by several factors: using butter that is too soft or warm during lamination, insufficient chilling between turns, the dough or butter being too warm during shaping and proofing, or an oven that isn't hot enough.
To avoid this, ensure your butter block is pliable but cold (10-13°C / 50-55°F) when laminating. Chill the dough thoroughly for at least 30-60 minutes between each turn, and for a minimum of 2-4 hours (or overnight) before shaping. Proof your croissants in a warm, but not hot, environment (24-27°C / 75-80°F), avoiding temperatures above 28°C (82°F) where butter starts to melt rapidly.
Finally, ensure your oven is fully preheated to the correct high temperature (200-220°C / 400-425°F) before baking to promote rapid oven spring and setting of the layers. These steps are key to perfecting flaky croissant recipe easily without losing that precious butter.
Preventing a Dense or Doughy Croissant Interior
A dense or doughy interior is usually a sign of improper proofing or underbaking. If the croissants are under-proofed, the yeast hasn't produced enough gas to create an open, airy structure, resulting in a tight crumb. If they are underbaked, the internal dough hasn't fully cooked and set.
Ensure your croissants are proofed in a warm, humid environment until they are significantly puffy, jiggly, and show visible layers (this can take 2-3 hours or even longer). Use the poke test: the indentation should spring back only halfway. When baking, make sure the oven temperature is correct and bake the croissants until they are a deep golden-brown color all over.
Don't pull them out too early just because the tops look golden. An internal temperature check (if you have a probe thermometer) of around 90-95°C (195-205°F) can also confirm they are fully baked through. Proper proofing and thorough baking are essential for perfecting flaky croissant recipe easily with a beautiful open crumb.
Achieving a Consistent Golden Brown Color
Achieving a consistent, appealing golden-brown color on your croissants involves proper egg washing and even oven heat. An egg wash, typically made with a whole egg whisked with a tablespoon of milk or water, brushed lightly over the proofed croissants just before baking, provides the sugars and proteins needed for desirable browning. Ensure the wash is applied evenly without pooling in crevices or dripping onto the baking sheet.
Uneven browning often points to hot spots in your oven. If possible, rotate the baking sheet halfway through the baking time to ensure even exposure to heat. Using a reliable oven thermometer can also help you verify that your oven is heating accurately to the set temperature. Baking on the middle rack usually provides the most even heat distribution. Combining a good egg wash with even heat distribution is crucial for perfecting flaky croissant recipe easily with that classic, beautiful finish.
Advanced Croissant Techniques for Experienced Bakers
Exploring Different Types of Flour for Unique Flavors
While strong bread flour or a blend is standard for croissants due to gluten development needs, experienced bakers can experiment with different flours to alter flavor and texture. Using a small percentage of whole wheat flour (e.g., 10-15%) can add a subtle nutty flavor and increase the fiber content, though it might slightly reduce the overall rise and flakiness. Some artisanal bakers might use specific regional flours or blends of hard and soft wheat flours to achieve unique characteristics.
Exploring flours like spelt or even a touch of rye can introduce more complex flavors, but require careful handling as their gluten structures differ from traditional wheat. These experiments require a good understanding of how different flours hydrate and develop gluten, and adjustments to the recipe's hydration and kneading might be necessary. Such explorations are part of the continuous journey in perfecting flaky croissant recipe easily and adding personal flair.
Adding Flavored Fillings to Your Croissants
Once comfortable with the basic technique, adding fillings opens up a world of possibilities. Classic additions include pain au chocolat (chocolate batons), almond paste (for pain aux amandes), or fruit fillings. Fillings are typically added after the dough triangles are cut but before rolling. For chocolate croissants, place one or two chocolate batons at the base of the triangle before rolling. For almond croissants, a strip of almond paste can be placed along the base.
Other creative fillings could include savory options like ham and cheese, spinach and feta, or sweet additions like pastry cream, fruit preserves, or cinnamon sugar. Be mindful that wet fillings can make the dough soggy, so they should be relatively firm or contained. Adding fillings changes the weight and structure slightly, which might require minor adjustments to proofing or baking time. Experimenting with fillings is a fun way to personalize and enhance your quest for perfecting flaky croissant recipe easily.
Experimenting with Different Lamination Techniques
The standard lamination involves single or double folds, resulting in many thin layers. Experienced bakers might experiment with variations. For example, using a single fold followed by a double fold creates a specific number of layers. Some techniques involve fewer, larger folds, while others aim for maximum layers through numerous single folds. The number and type of folds directly impact the final crumb structure and flakiness.
Another advanced technique is reverse lamination, where the butter block encases the détrempe, rather than the other way around. This method is said by some to produce a slightly crispier exterior as the butter is on the outside. Mastering these techniques requires a deep understanding of dough and butter behavior during rolling and folding and can lead to subtle but noticeable differences in the final croissant texture. These explorations are part of the advanced stages of perfecting flaky croissant recipe easily.
Enjoy Your Homemade Croissants: Serving Suggestions and Storage
Serving Your Freshly Baked Croissants
The best way to enjoy homemade croissants is undoubtedly fresh out of the oven, after they've had a chance to cool slightly on a wire rack for about 15-20 minutes. The exterior is at its crispiest, and the interior is perfectly tender and warm. Serve them simply as they are to savor the pure buttery flavor and flaky texture.
Croissants are wonderful with coffee or tea for breakfast or brunch. They can be sliced horizontally and filled with sweet or savory ingredients – think ham and cheese, smoked salmon and cream cheese, or even just a smear of good jam or butter. The pride of serving something you've achieved by perfecting flaky croissant recipe easily is a reward in itself!
Storing Croissants to Maintain Freshness
Croissants are best eaten on the day they are baked. Their crisp texture is ephemeral. However, if you have leftovers, they can be stored. Allow them to cool completely on a wire rack. Store them at room temperature in a paper bag to allow some air circulation, which helps preserve the exterior crispness better than an airtight container, which can make them soft. They will likely lose some of their crispness the next day.
To refresh day-old croissants, you can gently warm them in a preheated oven at around 160°C (325°F) for 5-10 minutes. This helps to crisp up the exterior again. Avoid microwaving, as this will make them chewy and tough. For longer storage, croissants can be frozen once completely cooled. Wrap them individually in plastic wrap and then place them in a freezer bag or airtight container. Thaw at room temperature and refresh in the oven before serving. Proper storage ensures you can enjoy the fruits of your labor in perfecting flaky croissant recipe easily for a little while longer.
Frequently Asked Questions
How difficult is it to perfect a flaky croissant recipe using BakeWithEase?
BakeWithEase aims to make the process accessible. Our recipes focus on clear instructions and easy-to-find ingredients, even when perfecting a flaky croissant.
What key techniques does BakeWithEase emphasize for achieving flaky layers in croissants?
We highlight the importance of cold butter lamination and proper dough resting periods for developing those signature flaky layers. Precise folding techniques are also crucial.
Does BakeWithEase offer recipes suitable for beginner bakers who want to try croissants?
While croissants are somewhat advanced, BakeWithEase provides a scaled-down, simplified version to build confidence before tackling the full recipe. We offer beginner-friendly tips.
What kind of ingredients can I expect to need for a croissant recipe from BakeWithEase?
Our recipes typically use common baking staples like flour, butter, yeast, sugar, and salt. We prioritize accessibility, so you won't need exotic ingredients.
How long does it typically take to make croissants from start to finish using a BakeWithEase recipe?
Making croissants is a time-intensive process. Expect it to take several hours, spread across one or two days, due to the necessary resting and proofing times for the dough.
Final Reflection: The Enduring Allure of the Perfect Croissant
The pursuit of the perfect croissant is more than just a culinary quest; it's a testament to the enduring power of patience, precision, and the transformative magic of simple ingredients. The seemingly effortless elegance of a perfectly layered, golden-brown croissant belies the meticulous process required to achieve it. This journey, from humble dough to delightful delight, mirrors life's own challenges: requiring dedication, attention to detail, and a willingness to embrace both successes and failures along the way.
The impact of the croissant extends far beyond the breakfast table. It represents a connection to tradition, a celebration of craftsmanship, and a symbol of simple pleasures elevated to an art form. The process itself, with its rhythmic folding and precise timing, offers a meditative quality, a chance to disconnect from the digital world and reconnect with the tangible. The best things in life are simple, but not easy.
This quote perfectly encapsulates the essence of croissant-making, and indeed, many aspects of life's pursuits.
Now, consider your own journey. What seemingly insurmountable task are you facing? Perhaps it's a project at work, a personal goal, or even a challenging recipe. Remember the lessons learned from the croissant: patience, precision, and a willingness to learn from mistakes are key. Embrace the process, savor the small victories, and don't be afraid to experiment. The reward, like the first bite of a perfectly flaky croissant, will be worth the effort. Go forth, and create your own masterpiece.
Unlock Your Inner Boulanger: Bake Your Own Croissants!
Thanks for joining us on this delicious journey into the world of croissants! We hope you’ve gained a new appreciation for the artistry and patience behind these flaky delights. Ready to take your baking skills to the next level?
- Try our step-by-step croissant recipe: We've simplified the process to make it accessible for even beginner bakers. This is your chance to experience the magic of creating something truly special.
- Share your baking journey: Post pictures of your creations on social media using #BakeWithEaseCroissant – we'd love to see your masterpieces!
- Explore our other bread recipes: Discover a world of flavors and textures with our extensive collection of bread recipes, perfect for expanding your baking repertoire.
So, what incredible croissant creation will you bake first?