
The Simple Science of Sourdough: Understanding Starter Activity


Welcome to BakeWithEase, your companion on the delightful journey of baking! Ever wondered about the magic behind that tangy, chewy loaf of sourdough? We're diving deep into the heart of it all: sourdough starter activity. This guide unravels the simple science, transforming you from a curious observer into a confident sourdough artisan. Ready to unlock the secrets to a thriving starter and consistently perfect bakes? Let's begin!
Welcome to the fascinating world of sourdough! Baking with a sourdough starter is a deeply rewarding experience, connecting you to ancient fermentation practices. At its heart lies your sourdough starter, a living ecosystem of wild yeast and bacteria. Understanding and fostering its activity is the single most crucial step towards achieving those beautiful loaves with their characteristic tang and airy crumb. This article serves as your comprehensive sourdough starter activity guide, demystifying the science behind the bubbles and helping you bake with confidence.
- Introduction to Sourdough Starter Activity
- Understanding the Sourdough Starter Ecosystem
- Identifying Key Signs of a Healthy and Active Sourdough Starter
- Factors Influencing Sourdough Starter Activity
- Troubleshooting Common Sourdough Starter Activity Problems
- Feeding Your Sourdough Starter for Optimal Activity
- Measuring Sourdough Starter Activity Quantitatively
- Utilizing Active Sourdough Starter in Baking
- Maintaining Long-Term Sourdough Starter Health and Activity
- Conclusion: Mastering Sourdough Starter Activity for Baking Success
-
Frequently Asked Questions
- What is a sourdough starter and why is its activity important?
- How can I tell if my sourdough starter is active enough to bake with?
- What factors can affect sourdough starter activity?
- How do I troubleshoot a sluggish or inactive sourdough starter?
- What does "discard" mean in the context of sourdough starter, and why is it necessary?
- Final Reflection: The Ever-Evolving Dance of Sourdough
- Unleash Your Inner Sourdough Baker!
Introduction to Sourdough Starter Activity
Getting acquainted with your sourdough starter's behavior is fundamental to successful sourdough baking. It's not just about having a jar of bubbly mixture; it's about understanding what that activity signifies and how it impacts your dough. An active starter is the engine that makes your bread rise, creates complex flavors, and contributes to that signature chewy texture.
Why Starter Activity Matters for Successful Sourdough Baking
The activity level of your sourdough starter directly influences the fermentation process in your final dough. Yeast in the starter consumes sugars and produces carbon dioxide, which creates lift and aeration. The bacteria (primarily lactic acid bacteria) produce organic acids, contributing to flavor and helping to break down gluten, which aids in texture development. If your starter isn't sufficiently active, it won't produce enough gas to leaven the bread effectively, potentially resulting in a dense, flat loaf.
Furthermore, a vigorous starter helps the dough reach its optimal fermentation stage within a predictable timeframe. This predictability is key to managing your baking schedule. A sluggish starter might take much longer to proof the dough, while an overly active one could lead to over-proofing before you're ready to bake. Mastering sourdough starter activity is therefore essential for consistent and reliable baking results.
BakeWithEase.com: Your Guide to Mastering Sourdough
At BakeWithEase.com, we aim to simplify complex baking topics like sourdough. This sourdough starter activity guide is designed to provide you with the knowledge and practical tips needed to understand and manage your starter effectively. We break down the science into easy-to-digest information, ensuring that bakers of all levels can confidently cultivate a thriving starter and produce delicious sourdough bread.
We cover everything from feeding schedules to troubleshooting common issues. Our goal is to empower you with the understanding necessary to interpret your starter's cues and respond appropriately, leading to more successful and enjoyable baking experiences. Think of us as your friendly guide on your sourdough journey, helping you unlock the secrets of this incredible living culture.
Understanding the Sourdough Starter Ecosystem
Your sourdough starter is a bustling community of microorganisms, primarily wild yeast and lactic acid bacteria (LAB). This complex ecosystem thrives in the mixture of flour and water you provide, undergoing a continuous cycle of fermentation. Understanding these key players and their interactions is crucial to appreciating what drives sourdough starter activity.
The Microbes at Work: Yeast and Bacteria in Sourdough
Wild yeasts, naturally present on flour and in the environment, are responsible for producing the carbon dioxide that makes your starter bubbly and helps your bread rise. Common species include Saccharomyces cerevisiae (also used in commercial yeast, but sourdough strains can differ) and Candida milleri. They feed on the simple sugars released when enzymes in the flour break down starches.
Lactic acid bacteria are equally important. They produce lactic acid and acetic acid, which give sourdough its characteristic tang. Examples include Lactobacillus sanfranciscensis, a species unique to sourdough starters. LAB also help create an acidic environment that inhibits the growth of undesirable microorganisms. The balance between yeast and bacteria activity influences both the leavening power and the flavor profile of your starter and, subsequently, your bread.
How Fermentation Drives Sourdough Starter Activity
Fermentation is the metabolic process where these microbes convert carbohydrates (sugars from the flour) into other products. Yeast fermentation primarily produces ethanol and carbon dioxide (CO₂). The CO₂ gas gets trapped within the gluten network of the starter, causing it to expand and create bubbles – a key sign of sourdough starter activity. This gas production is what provides the lift for your bread dough.
Bacterial fermentation produces organic acids, primarily lactic acid and acetic acid. Lactic acid contributes a mellow tang, while acetic acid provides a sharper, vinegar-like note. The ratio of these acids depends on factors like temperature and hydration. This acidic environment is vital; it helps break down phytates in the flour, making nutrients more available, and contributes significantly to the unique flavor and aroma of sourdough. The continuous cycle of feeding, fermentation, and acid production is the engine driving your starter's health and activity.
Identifying Key Signs of a Healthy and Active Sourdough Starter

Learning to read your sourdough starter is a vital skill. It communicates its health and readiness through various visual, tactile, and olfactory cues. Recognizing these signs is a fundamental part of being a successful sourdough baker and is a core component of any good sourdough starter activity guide.
Visual Cues: Observing Bubbles and Volume Increase
One of the most obvious signs of a healthy, active starter is the presence of bubbles. You'll see small bubbles throughout the mixture and larger ones breaking on the surface. This indicates that the yeast are actively producing carbon dioxide. Even more telling is the increase in volume. An active starter will typically double or even triple in size within a few hours after feeding, especially at optimal temperatures (around 70-78°F or 21-26°C).
Observe how high your starter rises in its jar. You can use a rubber band or marker on the outside of the jar to track its progress. The peak of its rise, before it starts to deflate slightly, is generally when it is most active and ready to be used for baking. This rise and fall cycle is a clear visual indicator of robust sourdough starter activity.
The Float Test: Determining Starter Readiness
A classic test for determining if your starter is ready to use is the float test. Gently take a small spoonful of your starter at its peak activity (when it has roughly doubled in volume). Carefully drop this spoonful into a glass of room-temperature water.
If the starter floats, it means it's full of trapped carbon dioxide gas, indicating high activity and readiness for baking. If it sinks, it might not be active enough yet, or it might have already peaked and started to deflate. While not foolproof, the float test is a quick and easy way to gauge your sourdough starter activity before mixing your dough.
The Aroma Test: Recognizing the Right Sourdough Smell
A healthy, active sourdough starter should have a pleasant, tangy aroma. It might smell slightly yeasty, acidic (like yogurt or vinegar), and perhaps even slightly sweet or alcoholic (especially when it's peaked and starting to break down). The balance of these smells can give you clues about the yeast-to-bacteria balance. A very sharp, overly vinegary smell might indicate a dominance of acetic acid bacteria, often due to cooler temperatures or infrequent feeding.
Conversely, unpleasant smells like moldy, cheesy, or strongly alcoholic (like nail polish remover) can indicate problems. A healthy aroma is a strong indicator of a balanced and active microbial community. Trust your nose as part of your sourdough starter activity guide.
Factors Influencing Sourdough Starter Activity
Several environmental and material factors play a significant role in how active your sourdough starter is. Understanding these influences allows you to manipulate conditions to encourage optimal sourdough starter activity for your baking needs.
The Role of Flour Type in Sourdough Fermentation
The type of flour you use to feed your starter significantly impacts its activity. Different flours contain varying levels of nutrients (sugars and proteins) and different microbial populations. Rye flour, for example, is known to be very rich in nutrients and enzymes, often leading to a very vigorous and fast-acting starter. Whole wheat flour also tends to be quite active due to its higher nutrient content compared to white flour.
Using a mix of flours, such as half all-purpose and half whole wheat or rye, can provide a good balance of nutrients for a healthy, active starter. Consistency in the flour type you use for feeding helps maintain predictable sourdough starter activity, though experimenting can also be fun.
Water Quality and its Impact on Starter Health
The quality of the water you use is also important. Tap water containing high levels of chlorine or chloramine can inhibit or even kill the beneficial microorganisms in your starter. These chemicals are added to public water supplies to kill bacteria, which is great for drinking water safety but bad for your starter's ecosystem.
If your tap water is heavily chlorinated, it's best to use filtered water or leave tap water out in an open container for 24 hours to allow the chlorine to dissipate. Water temperature also matters; using warm water (around 75-85°F or 24-29°C) when feeding can help kickstart sourdough starter activity, especially in cooler environments.
Temperature Control: Optimizing for Sourdough Starter Vigor
Temperature is perhaps the most critical factor affecting sourdough starter activity. The wild yeasts and bacteria in your starter thrive within a specific temperature range. Warmer temperatures (typically 70-80°F or 21-27°C) promote faster fermentation and more vigorous activity. In this range, your starter might double in 4-8 hours.
Cooler temperatures (below 68°F or 20°C) slow down microbial activity significantly. At refrigerator temperatures (around 40°F or 4°C), activity is almost completely dormant, which is why refrigeration is used for long-term storage. Maintaining a consistent, warm temperature is key to achieving predictable and robust sourdough starter activity. Many bakers use proofing boxes, ovens with lights on, or warm spots in their homes to achieve this.
Troubleshooting Common Sourdough Starter Activity Problems
Even with careful attention, your sourdough starter might occasionally seem sluggish or behave unexpectedly. Don't worry; this is normal! Understanding common issues and how to address them is part of the journey to mastering sourdough starter activity.
Inactive Starter: Reasons and Solutions
A starter that isn't rising or showing many bubbles might be inactive for several reasons, including insufficient feeding, low temperature, or poor water quality. If your starter hasn't risen much after 12-24 hours at room temperature, it's likely inactive.
Solutions involve reviewing your feeding routine, ensuring you're using unchlorinated water, and most importantly, increasing the temperature. Moving the starter to a warmer spot can often revive it quickly. Sometimes, simply feeding it more frequently (e.g., every 12 hours instead of 24) for a few days can boost its activity.
Addressing Under-Fermentation Issues
Under-fermentation in the starter means the microbes haven't had enough time or favorable conditions to consume the food and produce gas and acids. This often results from feeding too early (before the starter peaks), using too much starter relative to fresh flour/water (low feeding ratio), or keeping it too cold.
To address this, ensure you're feeding when the starter is at or just past its peak. Increase your feeding ratio (e.g., from 1:1:1 to 1:2:2 or even 1:3:3 starter:flour:water) to provide more food for the microbes. And crucially, raise the ambient temperature to the optimal range (70-80°F).
Reactivating a Dormant Sourdough Starter
If your starter has been dormant (e.g., stored in the fridge for weeks), it will need several feedings at room temperature to become active again.
- [ ] Take the starter out of the fridge.
- [ ] Discard most of it, leaving only a small amount (e.g., 20-30g).
- [ ] Feed it with equal parts flour and water (e.g., 50g flour, 50g water for 25g starter).
- [ ] Keep it in a warm place (70-80°F).
- [ ] Feed every 12-24 hours, discarding most before each feed, until it consistently doubles in volume within 4-8 hours. This might take 2-5 days.
Over-Active Starter: Understanding and Managing Rapid Fermentation
An over-active starter ferments very quickly, peaking and starting to fall within just a few hours after feeding. While this shows vigor, it means you have a short window to use it at its peak, or it might develop an overly acidic flavor. This often happens in very warm conditions or with very high feeding ratios.
Managing an over-active starter involves adjusting feeding ratios and temperature. You can use a higher ratio of flour and water to starter (e.g., 1:3:3 or 1:4:4) to provide more food, which slows down fermentation as the microbes have more to work through.
Preventing Over-Proofing
If your starter is peaking too fast for your baking schedule, it might be over-proofed by the time you're ready to mix dough. Using a starter that has significantly fallen can lead to less reliable leavening.
To prevent this, consider storing a small amount of starter in the fridge and taking it out to build a leaven (a larger, active amount for baking) a day or two before you need it. For starters kept at room temperature, feeding it with cooler water or using a higher feeding ratio can help slow down sourdough starter activity slightly.
Adjusting Feeding Schedules for Optimal Activity
The frequency of feeding is key to managing sourdough starter activity. If your starter is peaking and falling rapidly within 6-8 hours, consider feeding it twice a day. If it's taking longer than 12 hours to peak, once a day might be sufficient, or you might need to increase the temperature.
Finding the right feeding schedule depends on your ambient temperature and desired activity level. A starter fed every 12 hours at 75°F will be much more active than one fed every 24 hours at 68°F. Adjusting the schedule helps you maintain peak sourdough starter activity when you need it.
Mold and Off-Smells: Identifying and Preventing Contamination
Mold is a clear sign that your starter is contaminated and should be discarded. Mold can appear as fuzzy patches of various colors (green, black, pink, orange). If you see mold, unfortunately, you must start over.
Off-smells like cheesy, rancid, or strong acetone/nail polish remover (while some alcohol smell is normal at peak/fall, a very strong acetone smell can indicate the starter is hungry and breaking down) can signal imbalance or contamination. Acetone often means the starter is starving and needs more frequent feeding. Cheesy or rancid smells can indicate undesirable bacteria.
Prevention is key: always use clean jars and utensils, feed regularly with fresh flour and water, and maintain a healthy feeding schedule and temperature to favor the growth of beneficial microbes. A healthy, active starter is naturally resistant to contamination due to its acidic environment.
Feeding Your Sourdough Starter for Optimal Activity

Regular feeding is the cornerstone of a healthy and active sourdough starter. It provides the necessary nutrients for the wild yeast and bacteria to thrive and multiply, ensuring consistent sourdough starter activity.
The Importance of Regular Feeding Schedules
Consistent feeding maintains the microbial balance and ensures a steady supply of food. When you feed your starter, you are essentially refreshing its environment and providing new carbohydrates for the microbes to consume. Skipping feeds or feeding irregularly can lead to a buildup of acid, starvation of the microbes, and a decrease in activity.
For a starter kept at room temperature, daily feeding (or even twice daily in warmer conditions) is often necessary to keep it vigorous and ready for baking. This regular replenishment ensures that you always have a robust culture ready to leaven your bread, making it an essential part of any sourdough starter activity guide.
Understanding Feeding Ratios: Flour, Water, and Starter
Feeding ratios refer to the proportion of starter, flour, and water you combine. A common ratio is 1:1:1 by weight (e.g., 25g starter, 25g flour, 25g water). This provides a relatively quick feed, suitable for daily maintenance at average room temperatures.
Using a higher ratio of fresh flour and water to starter, such as 1:2:2 or 1:3:3, provides more food and slows down fermentation. This is useful for management in warmer temperatures, for starters that ferment very quickly, or if you need to go a bit longer between feeds. Conversely, a lower ratio like 1:0.5:0.5 would accelerate fermentation but require more frequent feeding. Experimenting with ratios helps you control the pace of sourdough starter activity.
Discarding vs. Using Sourdough Discard
When you feed your starter, you typically discard a portion of the old starter before adding fresh flour and water. This is essential for several reasons: it controls the volume of your starter (otherwise, you'd need a massive jar! ), removes accumulated waste products, and ensures that the fresh food is available to a manageable population of microbes, promoting vigorous sourdough starter activity.
The discarded starter is perfectly usable in other recipes that don't rely solely on it for leavening, such as pancakes, waffles, crackers, or muffins. It adds a lovely tangy flavor. However, for baking bread where strong leavening is needed, always use the portion of starter that has just been fed and has reached its peak activity.
Measuring Sourdough Starter Activity Quantitatively
While visual cues and the float test are helpful, using simple tools to quantitatively measure sourdough starter activity can provide more precise data, helping you understand its behavior better and troubleshoot more effectively.
Using a Thermometer to Monitor Temperature Changes
The internal temperature of your sourdough starter is a direct result of microbial activity; fermentation generates heat. While subtle, a healthy, active starter will often be a few degrees warmer than its surroundings, especially during its peak fermentation phase.
Using an instant-read thermometer can help you monitor this. More importantly, using a thermometer to measure the ambient temperature where your starter is stored is crucial. As mentioned, temperature is a major driver of activity. Knowing the precise temperature allows you to correlate it with your starter's behavior and adjust your feeding schedule or location accordingly, refining your sourdough starter activity guide.
Measuring Volume Increase Precisely
Tracking the volume increase of your starter over time provides a quantitative measure of its leavening power. Use a clear, straight-sided jar and mark the initial level of the starter immediately after feeding. A rubber band or a piece of tape works well.
Record the time and temperature, then note the height of the starter at regular intervals (e.g., every hour). This allows you to calculate the percentage increase in volume and determine how long it takes to peak (e.g., double or triple). Consistent doubling within a predictable timeframe (like 4-8 hours at 75°F) is a strong indicator of healthy, reliable sourdough starter activity.
Using a pH Meter for Advanced Analysis
For the truly dedicated baker, a pH meter can provide advanced insight into the acidic development of the starter. A mature, active sourdough starter typically has a pH between 3.5 and 4.0 at its peak acidity (just before or as it starts to fall).
Measuring pH can help confirm that the lactic acid bacteria are active and producing acids, contributing to flavor and shelf life. While not necessary for successful baking, monitoring pH can offer a deeper understanding of the microbial balance and fermentation process, adding another layer to your sourdough starter activity guide.
Utilizing Active Sourdough Starter in Baking
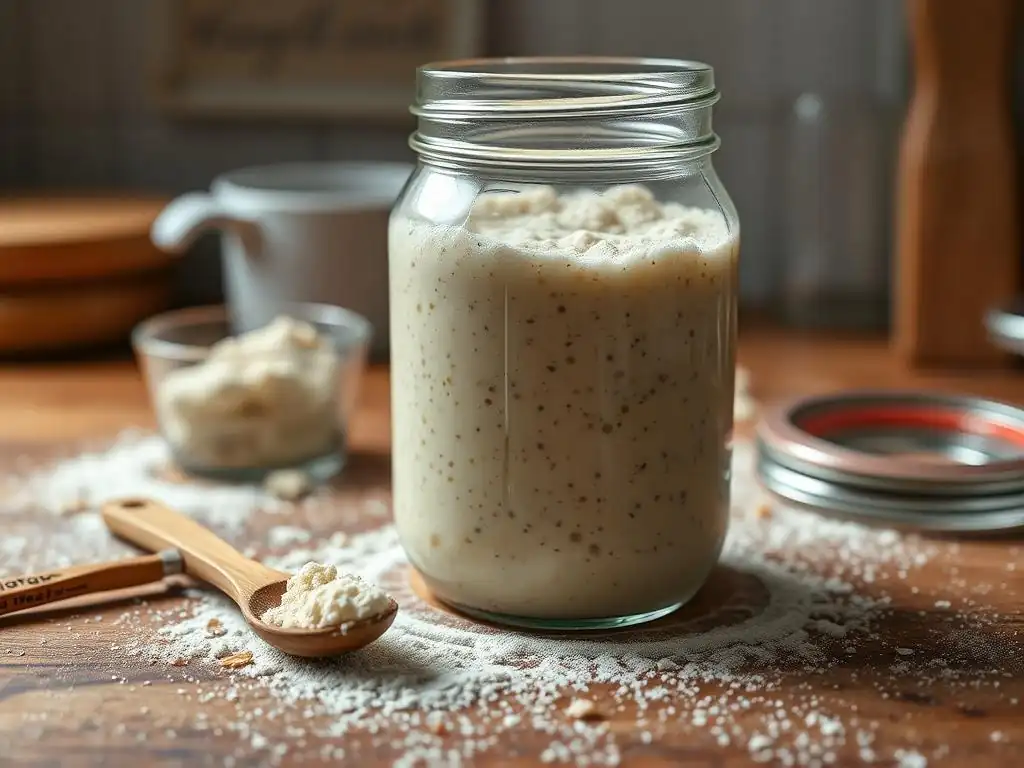
Having a healthy, active sourdough starter is the first step; knowing how to use it effectively in your bread dough is the next. The starter's activity level directly impacts the dough's fermentation time and behavior.
Adjusting Recipe Hydration Based on Starter Activity
Your starter's hydration (the ratio of water to flour it contains) contributes to the overall hydration of your final dough. Most sourdough starters are maintained at 100% hydration (equal weights of flour and water). If your recipe calls for a specific hydration and your starter is different, you'll need to adjust the amount of water or flour in the main dough to compensate.
For example, if you use a 100% hydration starter in a recipe designed for a stiffer starter (like 50% hydration), you'll need to slightly reduce the water added to the dough. Understanding your starter's hydration is key to accurately calculating total dough hydration, which significantly impacts the dough's handling and the final bread's texture.
Recognizing the Stages of Fermentation for Perfect Baking
An active starter begins the fermentation process in your dough as soon as it's mixed with the main ingredients. The dough will go through stages: initial mixing, bulk fermentation (first rise), shaping, and final proofing (second rise). The activity of your starter dictates how quickly the dough progresses through these stages.
Signs of successful fermentation in the dough mirror those in the starter: increased volume, visible bubbles (especially during bulk fermentation), and a pleasant, tangy aroma. Learning to recognize when your dough is properly proofed, based on signs like volume increase (e.g., doubled) and the "poke test" (gently pressing the dough; if it springs back slowly, it's ready), is critical and relies on consistent sourdough starter activity.
Tips for Successful Sourdough Baking with an Active Starter
- Use at Peak: For best results, use your starter when it has doubled or tripled in volume and is full of bubbles – typically 4-8 hours after feeding at room temperature.
- Factor in Temperature: Remember that warmer kitchen temperatures will accelerate dough fermentation, while cooler temperatures will slow it down. Adjust your bulk fermentation and proofing times accordingly, guided by your starter's known activity at similar temperatures.
- Don't Over-Proof: An active starter can over-proof dough quickly, leading to collapse and a poor crumb structure. Learn to recognize the signs of readiness (volume increase, poke test) and bake at the right time.
- Hydration Matters: Ensure your starter's hydration is consistent, or adjust the main dough ingredients to hit your target hydration. This consistency contributes to predictable sourdough starter activity in the dough.
Maintaining Long-Term Sourdough Starter Health and Activity
Once you have a robust and active starter, keeping it healthy for the long term is relatively simple with proper maintenance. Your storage method will dictate the feeding frequency needed to maintain optimal sourdough starter activity.
Storage Methods: Refrigerator vs. Room Temperature
Storing your starter at room temperature requires daily (or even twice daily) feeding to keep it active and ready for immediate use. This is ideal if you bake frequently (several times a week). The constant feeding maintains a high level of sourdough starter activity.
For less frequent bakers, storing the starter in the refrigerator is a convenient option. The cold temperature dramatically slows down microbial activity, allowing you to feed it much less often, typically once a week. This puts the starter into a semi-dormant state.
Reviving a Refrigerated Starter for Baking
A starter taken directly from the fridge will not be active enough for baking. It needs to be revived.
- [ ] Take your starter out of the fridge.
- [ ] Discard most of it, leaving a small amount.
- [ ] Feed it with your usual ratio (e.g., 1:1:1 or 1:2:2).
- [ ] Leave it at room temperature (70-80°F).
- [ ] Feed it every 12-24 hours, discarding most before each feed, until it consistently doubles in volume within 4-8 hours. This usually takes 1-3 feedings over 1-2 days. Once it shows this consistent peak activity, it's ready to bake with. This revival process is key to restoring sourdough starter activity after cold storage.
Preventing Common Starter Issues Through Proper Maintenance
Consistent care prevents most problems.
- Use clean jars and utensils.
- Feed with quality, unbleached flour and unchlorinated water.
- Maintain a consistent feeding schedule based on your storage method and temperature.
- Store in a clean jar with a lid that allows gas to escape (not airtight).
- Observe your starter regularly – look for bubbles, track its rise, and note its smell. Addressing minor issues (like sluggishness due to cold) promptly prevents them from becoming major problems. Proper maintenance is the best sourdough starter activity guide you can follow.
Conclusion: Mastering Sourdough Starter Activity for Baking Success
Understanding and managing your sourdough starter's activity is the cornerstone of successful and consistent sourdough baking. It's a skill that develops over time through observation and practice, turning the seemingly mysterious process into a predictable and enjoyable craft.
Key Takeaways for Understanding Sourdough Fermentation
Remember that your starter is a living ecosystem influenced by temperature, hydration, feeding schedule, and the quality of ingredients. Bubbles, volume increase, and a pleasant aroma are key indicators of healthy sourdough starter activity. Using tools like thermometers and tracking volume changes can provide valuable data.
Troubleshooting is a normal part of the process; most issues can be resolved by adjusting feeding ratios, frequency, or temperature. Patience and observation are your greatest allies in this journey.
Encouragement for Experimenting with Your Sourdough Starter
Don't be afraid to experiment! Try different flours, adjust hydration slightly, or vary feeding schedules to see how your starter responds. Each starter is unique, and learning its specific rhythms will make you a more intuitive baker. The more you work with your starter, the better you'll become at reading its needs and predicting its behavior, enhancing your understanding of sourdough starter activity.
Keep a baking journal to track your observations – feeding times, temperatures, rise times, and results. This data will be invaluable as you refine your process.
BakeWithEase: Continue Your Sourdough Journey
At BakeWithEase.com, we are committed to providing resources that make baking accessible and enjoyable. This sourdough starter activity guide is just one step in your journey. Explore our other articles and recipes to continue expanding your sourdough skills. With practice and attention to your starter's needs, you'll be baking beautiful, flavorful sourdough loaves with ease. Happy baking!
Frequently Asked Questions
What is a sourdough starter and why is its activity important?
A sourdough starter is a fermented dough containing wild yeasts and bacteria. Its activity, meaning its rise and fall, is crucial because it determines the leavening power and flavor of your sourdough bread.
How can I tell if my sourdough starter is active enough to bake with?
An active starter will have doubled in size within a few hours after feeding. You should also see plenty of bubbles throughout and a slightly tangy, pleasant aroma.
What factors can affect sourdough starter activity?
Several factors influence activity, including temperature, the type of flour used, and the feeding schedule. Too cold, the wrong flour, or infrequent feedings can slow it down.
How do I troubleshoot a sluggish or inactive sourdough starter?
Try adjusting the temperature to a warmer environment (70-75°F is ideal). Also, ensure you are feeding it regularly with a consistent ratio of flour and water.
What does "discard" mean in the context of sourdough starter, and why is it necessary?
"Discard" refers to removing a portion of the starter before feeding it. This prevents the starter from becoming too large and ensures the yeasts and bacteria have enough fresh food to thrive.
Final Reflection: The Ever-Evolving Dance of Sourdough
The simple science of sourdough starter activity isn't just about baking bread; it's about understanding a living ecosystem thriving in your kitchen. This seemingly straightforward process reveals a fascinating interplay of microorganisms, temperature, and time, a microcosm of the larger biological world around us. Mastering starter activity is not merely a culinary skill, but a gateway to appreciating the delicate balance of nature.
The journey of nurturing a sourdough starter has profoundly impacted my understanding of patience and observation. It's a humbling experience, witnessing the subtle shifts in the starter's behavior, learning to interpret its silent cues. This process mirrors the slow, deliberate pace of life often lost in our fast-paced world. The best things in life are worth waiting for,
a sentiment perfectly encapsulates the rewarding experience of tending to a thriving sourdough starter. The connection between the seemingly simple act of feeding a starter and the larger themes of nurturing and growth is undeniable.
Now, it's your turn. Consider the lessons learned here – the importance of observation, the power of patience, and the beauty of a living, breathing process. Don't just bake a loaf; cultivate a relationship with your starter. Observe its nuances, learn its rhythms, and allow this simple act to become a mindful practice, a daily reminder of the interconnectedness of life and the magic that unfolds when we take the time to truly understand the natural world, even in the smallest of ways.
Unleash Your Inner Sourdough Baker!
Thanks for diving into the fascinating world of sourdough starters! We hope you now have a clearer understanding of how to recognize and nurture a happy, active starter. Ready to put your new knowledge into practice?
- Give your starter a feeding boost! See how it responds to different flour types and hydration levels. Document your findings – you might uncover a new favorite combination.
- Share your sourdough journey! Post a picture of your thriving starter on social media and inspire others to bake their own.
- Consider experimenting with different hydration percentages in your next feeding to see how it impacts your starter's activity.
What unexpected discoveries will you make as you continue your sourdough adventure?