
Bake Rustic Ciabatta Bread Effortlessly

Welcome to BakeWithEase!
Ever dreamt of crafting perfectly airy and flavorful ciabatta right in your own kitchen? Unlock the secrets to our rustic ciabatta bread recipe and embark on a baking journey that's easier than you think. Discover the techniques and tips that will transform your baking skills, bringing the taste of authentic Italian bread to your table. Are you ready to experience baking bliss? Read on and let's get started!
- Bake Rustic Ciabatta Bread Effortlessly: Your Step-by-Step Guide
- Discover the Art of Rustic Ciabatta Bread Baking at Home
- Easy Rustic Ciabatta Bread Recipe: A Beginner-Friendly Approach
- Mastering Ciabatta Bread: Tips and Tricks for Success
- Beyond the Basics: Variations on the Rustic Ciabatta Bread Recipe
- Enjoy the Taste of Italy: Your Journey to Perfect Ciabatta Starts Now
-
Frequently Asked Questions
- How difficult is the rustic ciabatta bread recipe from BakeWithEase.com?
- What makes this ciabatta bread "rustic"?
- Where can I find the ingredients for the rustic ciabatta bread recipe?
- Does BakeWithEase.com provide step-by-step instructions for this ciabatta recipe?
- What other baking resources are available on BakeWithEase.com besides this recipe?
- Final Reflection: The Simple Joy of Rustic Ciabatta
- Unlock Your Inner Baker: Start Baking Today!
Bake Rustic Ciabatta Bread Effortlessly: Your Step-by-Step Guide
Discover the Art of Rustic Ciabatta Bread Baking at Home
Embrace Italian Baking Traditions with Ease
Ciabatta, meaning "slipper" in Italian, is a testament to the simple yet profound beauty of Italian baking traditions. Originating in the Veneto region of Italy in the early 1980s, it was created as a response to the popularity of French baguettes. Unlike many traditional European breads that rely on extensive kneading, the rustic ciabatta bread recipe embraces a high-hydration dough and minimal handling, resulting in its characteristic airy structure and chewy interior. This approach, while initially seeming counterintuitive to typical bread making, is surprisingly accessible to home bakers.
At BakeWithEase.com, we demystify the process of creating this iconic loaf right in your own kitchen. You don't need years of experience to master the rustic ciabatta bread recipe. By focusing on understanding the role of each ingredient and handling the dough gently, you can achieve that signature open crumb and crispy crust. Our step-by-step guide breaks down the process into manageable parts, ensuring that even beginners can confidently tackle this rewarding baking project and bring a piece of authentic Italian flavor to their table.
Why Bake Ciabatta? The Appeal of This Rustic Bread
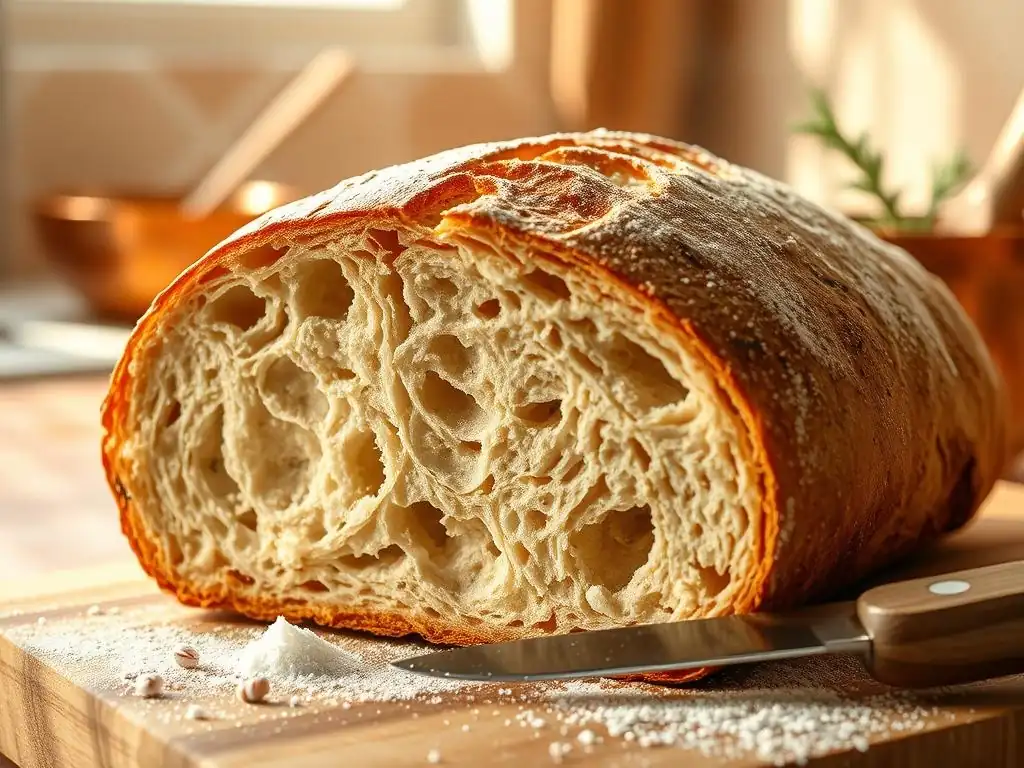
Baking your own rustic ciabatta bread offers a uniquely satisfying experience, yielding a loaf far superior to most store-bought versions. Its primary appeal lies in its distinct texture: a thin, crackly crust gives way to a light, open, and incredibly chewy interior. This is largely due to its high hydration level, often ranging from 75% to 85% water relative to the flour weight, compared to typical sandwich bread which might be around 60%. This high water content contributes significantly to the large, irregular holes that are the hallmark of a well-made ciabatta.
Beyond its delightful texture, ciabatta's mild, slightly tangy flavor makes it incredibly versatile. It's the perfect vehicle for soaking up olive oil, serving alongside soups and stews, or transforming into magnificent sandwiches and paninis. The satisfaction of pulling a warm, golden-brown loaf of homemade rustic ciabatta bread from your oven, filling your kitchen with its inviting aroma, is an unparalleled reward for your baking efforts. It's a simple pleasure that elevates everyday meals into something special.
Easy Rustic Ciabatta Bread Recipe: A Beginner-Friendly Approach
Gathering Your Ingredients for Authentic Ciabatta
To embark on your journey to bake rustic ciabatta bread, you'll need just a few basic ingredients. The quality of these components plays a significant role in the final outcome, so choosing wisely is the first step towards success. Our simple rustic ciabatta bread recipe focuses on essential ingredients that are easy to find and work with, ensuring a smooth baking experience.
High-Protein Flour: The Key to Ciabatta's Signature Texture
The structure of rustic ciabatta bread heavily relies on strong gluten development, which is best achieved using high-protein flour. Bread flour, with a protein content typically ranging from 12% to 14%, is the ideal choice for this recipe. This higher protein level, compared to all-purpose flour (around 10-11%), allows the dough to develop a robust gluten network capable of trapping the gases produced during fermentation.
A strong gluten network is essential for supporting the high hydration of ciabatta dough and creating that desired airy, open crumb structure. While you can make ciabatta with all-purpose flour, the texture will likely be less open and chewier. Opting for quality bread flour will significantly increase your chances of achieving the perfect rustic ciabatta bread with its characteristic irregular holes and delightful chewiness.
The Importance of Water in Ciabatta Dough Hydration
Water is arguably the most critical ingredient in a rustic ciabatta bread recipe, defining its unique character. Ciabatta is known for being a high-hydration dough, meaning the weight of the water is significantly higher than the weight of the flour, often exceeding 70%. This high ratio of water to flour results in a very wet and sticky dough that requires a different handling approach than lower-hydration breads.
The generous amount of water contributes directly to the bread's open crumb and moist interior. During baking, the high water content turns to steam within the loaf, expanding the air pockets and creating those large, irregular holes. Working with such a wet dough can be challenging initially, but understanding that the stickiness is normal and necessary for the desired texture is key to successfully baking rustic ciabatta bread.
Yeast Options: Instant vs. Active Dry Yeast for Ciabatta
Yeast is the leavening agent that makes your rustic ciabatta bread rise, contributing to both its volume and flavor development. You typically have two main options: instant yeast or active dry yeast. Instant yeast is convenient as it can be mixed directly into the dry ingredients without prior activation, and it generally works slightly faster. Active dry yeast, on the other hand, requires proofing in warm water (usually around 105-115°F or 40-46°C) for 5-10 minutes until foamy before being added to the other ingredients.
For a standard rustic ciabatta bread recipe using roughly 500g of flour, you might use about 1-2 teaspoons (around 5-7g) of instant yeast or slightly more active dry yeast (perhaps 1.5-2.5 teaspoons) to achieve a good rise over a few hours. Both types will work, but instant yeast offers a slightly simpler process for beginners. The amount of yeast and the fermentation time can be adjusted based on desired flavor development and ambient temperature.
Step-by-Step Guide to Making Authentic Ciabatta Dough
Creating the dough for a rustic ciabatta bread recipe involves a few key stages, focusing on developing strength in a very wet mixture with minimal force. Patience and gentle handling are more important here than aggressive kneading. Follow these steps to build your authentic ciabatta dough.
Mixing the Initial Dough: The Poolish Method (Optional)
While not strictly mandatory for a simple rustic ciabatta bread recipe, using a poolish (a type of preferment) significantly enhances the flavor and texture of the final loaf. A poolish is typically made by mixing equal parts flour and water with a small amount of yeast (perhaps 0.1-0.5% of the flour weight) and letting it ferment at room temperature for 12-16 hours, or in the refrigerator for up to 2-3 days. This long, slow fermentation develops complex flavors and helps create a more open crumb.
To incorporate a poolish, you would first mix your poolish ingredients and let them ferment until bubbly and slightly collapsed in the center. Then, you combine the matured poolish with the remaining flour, water, yeast (if using more), and salt for the main dough. The overall hydration of the final dough remains high, but the poolish pre-hydrates a portion of the flour and kickstarts enzymatic activity, leading to better structure and taste in your rustic ciabatta bread.
First Rise: Achieving Optimal Fermentation
The first rise, or bulk fermentation, is a crucial stage in developing the flavor and structure of your rustic ciabatta bread dough. Given the high hydration, traditional kneading is often replaced by a series of 'stretch and folds'. After initially mixing the wet, shaggy dough and letting it rest for 20-30 minutes, you perform a series of folds every 30-45 minutes over the next 1.5 to 3 hours, depending on the room temperature. To do a fold, gently stretch a portion of the dough up and fold it back over the rest, rotating the bowl and repeating several times.
This process builds strength in the gluten network without forcing the air out of the dough. By the end of the bulk fermentation, the dough should be significantly increased in volume (perhaps doubled), airy, and feel much more cohesive and less shaggy than when you started. It should also have a bubbly surface. Proper fermentation during this stage is essential for achieving the desired light and open texture of rustic ciabatta bread.
Shaping the Ciabatta: Preserving the Airy Texture
Shaping ciabatta is less about creating taut surface tension and more about gently dividing and forming the dough while preserving the precious air pockets developed during fermentation. Once the bulk fermentation is complete, carefully turn the dough out onto a generously floured surface. Avoid the temptation to punch it down or knead it. Using a bench scraper, gently divide the dough into the desired number of pieces (typically 2-4 for loaves, more for rolls).
Working quickly and gently, shape each piece into a rough rectangle or square. You can lightly fold the edges underneath or simply pat them into shape, ensuring you don't press down too hard. The goal is to maintain the airy structure. Place the shaped loaves onto a well-floured couche (linen cloth) or parchment paper separated by folds, ensuring they have room to expand during the final proof. Gentle handling at this stage is paramount for a successful rustic ciabatta bread.
Second Rise: Proofing for a Light and Open Crumb
The second rise, or final proofing, is the final stage of fermentation before baking your rustic ciabatta bread. The shaped loaves need time to relax and increase slightly in volume. This typically takes 30 to 60 minutes at room temperature, depending on the dough's activity and the ambient temperature. The dough should look puffy and airy.
A good way to test if the dough is ready is the 'poke test'. Gently press your floured finger into the side of the loaf; if the indentation springs back slowly and only partially, the dough is properly proofed. If it springs back immediately, it needs more time. If it stays completely indented, it might be slightly over-proofed, but can often still be baked successfully. Proper proofing ensures a light texture and contributes to the oven spring, resulting in that classic rustic ciabatta bread appearance.
Baking Your Rustic Ciabatta to Perfection
Baking ciabatta requires a hot oven and the creation of steam to achieve its characteristic crispy crust and maximum oven spring. Getting these elements right is key to transforming your dough into a beautiful loaf of rustic ciabatta bread.
Oven Temperature and Baking Time for Ciabatta
Rustic ciabatta bread bakes best at high temperatures to encourage rapid oven spring and develop a crispy crust. Preheat your oven to a high temperature, typically between 450°F and 500°F (230°C to 260°C). Allow the oven to preheat for at least 30-45 minutes, ideally with a baking stone or steel inside, to ensure the temperature is stable and surfaces are hot.
The baking time for ciabatta loaves is usually between 20 and 30 minutes. Smaller rolls might take slightly less time, around 15-20 minutes. You'll know your rustic ciabatta bread is done when the crust is a deep golden brown and the internal temperature reaches around 200-210°F (93-99°C). Baking at a high initial temperature helps set the crust quickly, allowing the interior to expand.
Creating Steam for a Crispy Crust
Steam in the oven during the initial phase of baking is crucial for developing a thin, crispy crust on your rustic ciabatta bread. Without steam, the crust forms too quickly and becomes thick and hard, restricting oven spring. Steam keeps the surface of the dough moist, allowing it to expand fully before the crust sets.
There are several ways to create steam in a home oven. One common method is to place a metal baking pan (not glass or ceramic) on the bottom rack of your oven while it preheats. Just before loading your bread, carefully pour about a cup of hot water or a handful of ice cubes into the hot pan.
This will immediately create steam. Another method is to use a Dutch oven or a cloche, which traps the moisture released by the bread itself. Maintain the steam for the first 10-15 minutes of baking, then remove the steam source for the remainder of the bake to allow the crust to crisp up.
Cooling and Enjoying Your Homemade Ciabatta
Once your rustic ciabatta bread is baked to a beautiful golden brown, it's essential to let it cool properly before slicing. Resist the urge to cut into it immediately, as the internal structure is still setting, and the steam needs to escape gradually. Placing the hot loaves on a wire rack allows air to circulate around them, preventing the bottom crust from becoming soggy.
Allow the ciabatta to cool for at least 30-60 minutes. Cutting into a hot loaf will result in a gummy interior. As it cools, the crust will crisp up further, and the internal structure will stabilize, giving you that perfect chewy texture and open crumb. Once cooled, your homemade rustic ciabatta bread is ready to be enjoyed in countless ways – torn, sliced, or used as the foundation for a delicious meal.
Mastering Ciabatta Bread: Tips and Tricks for Success
Baking rustic ciabatta bread can be incredibly rewarding, and a few key insights can help you achieve consistently excellent results. Understanding the nuances of this high-hydration dough will elevate your baking skills.
Achieving the Perfect Open Crumb Structure
The signature open crumb, with its large, irregular holes, is the holy grail for many baking rustic ciabatta bread. This texture is primarily a result of high hydration, proper gluten development through gentle handling (like stretch and folds), and sufficient fermentation. Dough hydration levels of 75% or higher are critical; more water allows for greater expansion of gas bubbles during fermentation and baking.
Beyond hydration, avoiding aggressive kneading and handling is paramount. Each time you handle the dough roughly, you risk degassing it, collapsing the delicate network of air pockets. Gentle folding during the bulk fermentation and minimal shaping before the final proof help preserve these bubbles. Furthermore, a hot oven with plenty of steam ensures maximum oven spring, causing the internal gases to expand rapidly and solidify the open structure before the crust fully sets.
Troubleshooting Common Ciabatta Baking Problems
Even with a great rustic ciabatta bread recipe, you might encounter challenges. Knowing how to address common issues can save your loaf and improve your next bake. Don't be discouraged by imperfections; they are part of the learning process.
Dough Too Sticky? Solutions for Handling High-Hydration Dough
Working with a high-hydration dough, like that for rustic ciabatta bread, means dealing with stickiness. Doughs with 75%+ hydration are naturally very wet and challenging to handle. The key is to embrace the stickiness rather than fighting it with excessive flour, which can make the bread dense.
Instead of kneading on a floured surface, try the 'slap and fold' method, which involves repeatedly lifting, slapping, and folding the dough onto a clean, unfloured surface (like a granite countertop or wooden board). Alternatively, keep your hands and bench scraper wet or lightly oiled when handling the dough during folds and shaping. Generously flour your proofing surface (like a couche or parchment paper) to prevent sticking during the final rise. Remember, a sticky dough is a sign you're on the right track for an open crumb!
Flat Ciabatta? Tips for Proper Proofing and Shaping
A flat ciabatta loaf can be disappointing but is a common issue often related to proofing or shaping. Under-proofing means the dough hasn't developed enough gas to hold its shape and expand in the oven. Over-proofing, conversely, means the gluten structure has weakened and can no longer support the trapped gases, causing the dough to collapse when moved or during the initial minutes in the oven.
Ensure your dough passes the poke test before baking. Shaping also plays a role; handling the dough too roughly can knock out the air you worked so hard to develop. Be gentle when dividing and forming the loaves. Use a well-floured peel or baking sheet to slide the dough into the oven, minimizing handling. Proper fermentation time, gentle handling, and careful transfer to the oven are critical steps to prevent your rustic ciabatta bread from turning out flat.
Storing Your Ciabatta Bread for Maximum Freshness
Rustic ciabatta bread is best enjoyed fresh, ideally within 1-2 days of baking, when its crust is crisp and its interior is soft and chewy. Store it at room temperature in a paper bag. A paper bag allows the crust to breathe, helping it stay crispy longer than plastic, which traps moisture and can make the crust soft.
For longer storage, ciabatta freezes exceptionally well. Once completely cooled, slice the loaf (or freeze it whole) and wrap it tightly in plastic wrap, then place it in a freezer-safe bag or container. Frozen ciabatta can last for up to 3 months. To enjoy, thaw at room temperature and refresh in a hot oven (around 350°F or 175°C) for 5-10 minutes to crisp up the crust. This allows you to enjoy your delicious homemade rustic ciabatta bread long after baking.
Beyond the Basics: Variations on the Rustic Ciabatta Bread Recipe
Once you've mastered the basic rustic ciabatta bread recipe, you can easily experiment with variations to add different flavors and uses. Ciabatta's versatile nature makes it a perfect base for culinary creativity.
Adding Herbs and Flavors to Your Ciabatta
Infusing your rustic ciabatta bread with herbs and other savory additions is a simple way to elevate its flavor profile. Dried herbs like rosemary, thyme, or oregano can be mixed into the dough during the initial mixing stage. For a loaf using 500g of flour, start with 1-2 tablespoons of dried herbs.
Other popular additions include chopped olives, sun-dried tomatoes (drained well), roasted garlic, or grated Parmesan cheese. Add these ingredients towards the end of the initial mixing or during the first set of stretch and folds. Be mindful that wet additions like olives or sun-dried tomatoes can affect the overall hydration slightly. For example, adding 1/4 cup of chopped olives will introduce extra moisture and flavor, creating a delightful variation of your rustic ciabatta bread.
Ciabatta Rolls: A Smaller, Equally Delicious Option
You don't always have to bake large loaves of rustic ciabatta bread. Dividing the dough into smaller portions before the final proof yields delicious ciabatta rolls, perfect for individual servings or sandwiches. The process is identical to making loaves, except for the shaping step.
Instead of forming large rectangles, gently divide the dough into smaller pieces, roughly 4-6 inches long. Place these smaller pieces onto your floured proofing surface, giving them adequate space. The baking time for rolls will be shorter than for a large loaf, typically around 15-20 minutes, depending on their size and your oven. Ciabatta rolls offer the same wonderful open crumb and crispy crust as their larger counterparts.
Using Ciabatta for Delicious Sandwiches and Paninis
Rustic ciabatta bread is arguably best known for its use in sandwiches and paninis. Its sturdy yet airy structure makes it ideal for holding fillings, and its chewy texture provides a satisfying bite. From simple ham and cheese to elaborate Italian-style subs, ciabatta is a perfect base.
To make a panini, slice the ciabatta horizontally, fill it with your desired ingredients (such as prosciutto, mozzarella, tomatoes, and basil), brush the outside lightly with olive oil, and grill in a panini press until golden brown and the cheese is melted. The high hydration and open crumb of the ciabatta allow it to compress beautifully in the press, creating a warm, crispy-on-the-outside, soft-on-the-inside sandwich. It's a prime example of how the unique qualities of rustic ciabatta bread shine in specific applications.
Enjoy the Taste of Italy: Your Journey to Perfect Ciabatta Starts Now
Frequently Asked Questions
How difficult is the rustic ciabatta bread recipe from BakeWithEase.com?
The recipe is designed for bakers of all levels, even beginners. The steps are simple and easy to follow, with readily available ingredients.
What makes this ciabatta bread "rustic"?
The "rustic" aspect refers to its irregular shape, large holes in the crumb, and slightly crusty exterior, achieved through specific baking techniques.
Where can I find the ingredients for the rustic ciabatta bread recipe?
BakeWithEase.com uses easy-to-find ingredients available at most grocery stores, making it convenient to bake this bread.
Does BakeWithEase.com provide step-by-step instructions for this ciabatta recipe?
Yes, BakeWithEase.com offers detailed step-by-step guides to ensure you successfully bake your rustic ciabatta bread effortlessly.
What other baking resources are available on BakeWithEase.com besides this recipe?
BakeWithEase.com offers a wide array of resources including recipes for pastries, breads, cakes, and cookies, catering to various baking interests and skill levels.
Final Reflection: The Simple Joy of Rustic Ciabatta
The seemingly complex art of baking rustic ciabatta bread is, in reality, surprisingly accessible. Mastering this technique isn't about achieving perfection on the first try, but about embracing the process and finding joy in the simple act of creating something delicious from humble ingredients. The satisfying aroma filling your kitchen, the satisfying chew of the crust, and the airy crumb within—these are rewards worth striving for.
The enduring appeal of ciabatta lies not just in its taste, but in its ability to connect us to a slower, more mindful way of cooking. It's a stark contrast to the instant gratification of modern life. The time spent kneading, proofing, and baking becomes a meditative practice, a moment of calm amidst the chaos. As the great baker, Jim Lahey, once said: Bread baking is a metaphor for life. You put in the effort, you wait patiently, and then you are rewarded with something beautiful and delicious.
This sentiment perfectly encapsulates the experience of making ciabatta.
Now, I invite you to roll up your sleeves, gather your ingredients, and embark on your own ciabatta journey. Don't be afraid to experiment, to adjust the recipe to your liking, and to embrace the imperfections. The true reward lies not in a perfectly symmetrical loaf, but in the satisfaction of creating something nourishing and delicious with your own two hands. The journey of baking ciabatta is a journey of self-discovery, patience, and ultimately, the simple joy of good bread.
Unlock Your Inner Baker: Start Baking Today!
Thanks for joining us on this ciabatta journey! We hope you gained the confidence to tackle this seemingly complex bread. Now it's time to put your newfound knowledge to the test.
- Bake your own rustic ciabatta: Grab your ingredients and follow our recipe – you’ll be amazed at how easy it is! This is your chance to experience the satisfaction of homemade bread.
- Share your baking journey: Snap a photo of your finished loaf and share it on social media using #BakeWithEaseCiabatta – we'd love to see your creations!
- Explore our other easy bread recipes: Discover new flavors and techniques on our website to expand your baking repertoire. You might surprise yourself!
What unique twist will you add to your first ciabatta? Let us know in the comments below!